并发编程-黑马 Java并发 - Nyima’s Blog (gitee.io)
本博客根据黑马java并发编程教程
源于:Java并发 - Nyima’s Blog (gitee.io)
一、基本概念 1、进程与线程 进程
程序由指令和数据组成,但这些指令要运行,数据要读写,就必须将指令加载至 CPU,数据加载至内存。在指令运行过程中还需要用到磁盘、网络等设备。进程就是用来加载指令、管理内存、管理 IO 的。
当一个程序被运行,从磁盘加载这个程序的代码至内存,这时就开启了一个进程。
进程就可以视为程序的一个实例。大部分程序可以同时运行多个实例进程(例如记事本、画图、浏览器 等),也有的程序只能启动一个实例进程(例如网易云音乐、360 安全卫士等)
线程
一个进程之内可以分为一到多个线程。
一个线程就是一个指令流,将指令流中的一条条指令以一定的顺序交给 CPU 执行 。
Java 中,线程作为小调度单位,进程作为资源分配的小单位。 在 windows 中进程是不活动的,只是作 为线程的容器
二者对比
进程基本上相互独立的,而线程存在于进程内,是进程的一个子集 进程拥有共享的资源,如内存空间等,供其内部的线程共享
进程间通信较为复杂 同一台计算机的进程通信称为 IPC(Inter-process communication)
不同计算机之间的进程通信,需要通过网络,并遵守共同的协议,例如 HTTP
线程通信相对简单,因为它们共享进程内的内存,一个例子是多个线程可以访问同一个共享变量 线程更轻量,线程上下文切换成本一般上要比进程上下文切换低
进程和线程的切换 上下文切换
内核为每一个进程维持一个上下文。上下文就是内核重新启动一个被抢占的进程所需的状态。 包括以下内容:
通用目的寄存器
浮点寄存器
程序计数器
用户栈
状态寄存器
内核栈
各种内核数据结构:比如描绘地址空间的页表 ,包含有关当前进程信息的进程表 ,以及包含进程已打开文件的信息的文件表
进程切换和线程切换的主要区别
最主要的一个区别在于进程切换涉及虚拟地址空间的切换而线程不会 。因为每个进程都有自己的虚拟地址空间,而线程是共享所在进程的虚拟地址空间的 ,因此同一个进程中的线程进行线程切换时不涉及虚拟地址空间的转换
页表查找是一个很慢的过程,因此通常使用cache来缓存常用的地址映射,这样可以加速页表查找,这个cache就是快表TLB(translation Lookaside Buffer,用来加速页表查找)。由于每个进程都有自己的虚拟地址空间,那么显然每个进程都有自己的页表,那么当进程切换后页表也要进行切换,页表切换后TLB就失效了 ,cache失效导致命中率降低,那么虚拟地址转换为物理地址就会变慢,表现出来的就是程序运行会变慢,而线程切换则不会导致TLB失效,因为线程线程无需切换地址空间,因此我们通常说线程切换要比较进程切换快
而且还可能出现缺页中断 ,这就需要操作系统将需要的内容调入内存中,若内存已满则还需要将不用的内容调出内存,这也需要花费时间
为什么TLB能加快访问速度
快表可以避免每次都对页号进行地址的有效性判断。快表中保存了对应的物理块号,可以直接计算出物理地址,无需再进行有效性检查
2、并发与并行 并发是一个CPU在不同的时间去不同线程中执行指令。
并行是多个CPU同时处理不同的线程。
引用 Rob Pike 的一段描述:
并发(concurrent)是同一时间应对 (dealing with)多件事情的能力
并行(parallel)是同一时间动手做 (doing)多件事情的能力
3、应用 应用之异步调用(案例1) 以调用方角度来讲,如果
需要等待结果返回,才能继续运行就是同步
不需要等待结果返回,就能继续运行就是异步
\1) 设计
比如在项目中,视频文件需要转换格式等操作比较费时,这时开一个新线程处理视频转换,避免阻塞主线程
tomcat 的异步 servlet 也是类似的目的,让用户线程处理耗时较长的操作,避免阻塞
tomcat 的工作线程 ui 程序中,开线程进行其他操作,避免阻塞 ui 线程
结论
单核 cpu 下,多线程不能实际提高程序运行效率,只是为了能够在不同的任务之间切换,不同线程轮流使用 cpu ,不至于一个线程总占用 cpu,别的线程没法干活
多核 cpu 可以并行跑多个线程,但能否提高程序运行效率还是要分情况的
有些任务,经过精心设计,将任务拆分,并行执行,当然可以提高程序的运行效率。但不是所有计算任 务都能拆分(参考后文的【阿姆达尔定律】)
也不是所有任务都需要拆分,任务的目的如果不同,谈拆分和效率没啥意义
IO 操作不占用 cpu,只是我们一般拷贝文件使用的是【阻塞 IO】,这时相当于线程虽然不用 cpu,但需要一 直等待 IO 结束,没能充分利用线程。所以才有后面的【非阻塞 IO】和【异步 IO】优化
二、线程的创建 1、创建一个线程(非主线程) 方法一:通过继承Thread创建线程 1 2 3 4 5 6 7 8 9 10 11 12 13 14 public class CreateThread {public static void main (String[] args) {Thread myThread = new MyThread ();class MyThread extends Thread {@Override public void run () {"my thread running..." );
使用继承方式的好处是,在run()方法内获取当前线程直接使用this就可以了,无须使用Thread.currentThread()方法;不好的地方是Java不支持多继承,如果继承了Thread类,那么就不能再继承其他类。另外任务与代码没有分离,当多个线程执行一样的任务时需要多份任务代码
方法二:使用Runnable配合Thread(推荐) 1 2 3 4 5 6 7 8 9 10 11 12 13 14 15 public class Test2 {public static void main (String[] args) {Runnable r = new Runnable () {@Override public void run () {"Runnable running" );Thread t = new Thread (r);
或者
1 2 3 4 5 6 7 8 9 10 11 12 13 14 15 public class CreateThread2 {private static class MyRunnable implements Runnable {@Override public void run () {"my runnable running..." );public static void main (String[] args) {MyRunnable myRunnable = new MyRunnable ();Thread thread = new Thread (myRunnable);
通过实现Runnable接口,并且实现run()方法。在创建线程时作为参数传入该类的实例即可
方法二的简化:使用lambda表达式简化操作 当一个接口带有@FunctionalInterface注解时,是可以使用lambda来简化操作的
所以方法二中的代码可以被简化为
1 2 3 4 5 6 7 8 9 10 11 12 13 14 public class Test2 {public static void main (String[] args) {Runnable r = () -> {"Runnable running" );"Hello Thread" );Thread t = new Thread (r);
可以再Runnable上使用Alt+Enter
原理之 Thread 与 Runnable 的关系 分析 Thread 的源码,理清它与 Runnable 的关系小结
方法1 是把线程和任务合并在了一起
方法2 是把线程和任务分开了
用 Runnable 更容易与线程池等高级 API 配合 用 Runnable 让任务类脱离了 Thread 继承体系,更灵活
方法三:使用FutureTask与Thread结合 使用FutureTask可以用泛型指定线程的返回值类型(Runnable的run方法没有返回值)
1 2 3 4 5 6 7 8 9 10 11 12 13 14 15 16 17 18 public class Test3 {public static void main (String[] args) throws ExecutionException, InterruptedException {new FutureTask <Integer>(new Callable <Integer>() {@Override public Integer call () throws Exception {"线程执行!" );1000 );return 100 ;Thread r1 = new Thread (task, "t2" );
或
1 2 3 4 5 6 7 8 9 10 11 12 13 14 15 16 public class UseFutureTask {public static void main (String[] args) throws ExecutionException, InterruptedException {new FutureTask <>(new MyCall ());Thread thread = new Thread (futureTask);class MyCall implements Callable <String> {@Override public String call () throws Exception {return "hello world" ;
总结 使用继承方式的好处是方便传参 ,你可以在子类里面添加成员变量,通过set方法设置参数或者通过构造函数进行传递,而如果使用Runnable方式,则只能使用主线程里面被声明为final的变量。不好的地方是Java不支持多继承 ,如果继承了Thread类,那么子类不能再继承其他类,而Runable则没有这个限制。前两种方式都没办法拿到任务的返回结果,但是Futuretask方式可以
2、原理之线程运行 栈与栈帧 Java Virtual Machine Stacks (Java 虚拟机栈) 我们都知道 JVM 中由堆、栈、方法区所组成,其中栈内存是给谁用的呢?
其实就是线程,每个线程启动后,虚拟机就会为其分配一块栈内存
每个栈由多个栈帧(Frame)组成,对应着每次方法调用时所占用的内存
每个线程只能有一个活动栈帧,对应着当前正在执行的那个方法
线程上下文切换(Thread Context Switch) 因为以下一些原因导致 cpu 不再执行当前的线程,转而执行另一个线程的代码
线程的 cpu 时间片用完
垃圾回收 有更高优先级的线程需要运行
线程自己调用了 sleep、yield、wait、join、park、synchronized、lock 等方法
当 Context Switch 发生时,需要由操作系统保存当前线程的状态,并恢复另一个线程的状态,Java 中对应的概念 就是程序计数器(Program Counter Register),它的作用是记住下一条 jvm 指令的执行地址,是线程私有的
状态包括程序计数器、虚拟机栈中每个栈帧的信息,如局部变量、操作数栈、返回地址等
Context Switch 频繁发生会影响性能
3、常用方法 (1)start() vs run() 被创建的Thread对象直接调用重写的run方法时, run方法是在主线程 中被执行的,而不是在我们所创建的线程中执行。所以如果想要在所创建的线程中执行run方法,需要使用Thread对象的start方法。
(2)sleep()与yield() sleep (使线程阻塞)
调用 sleep 会让当前线程从 Running 进入 Timed Waiting 状态(阻塞) ,可通过state()方法查看
其它线程可以使用 interrupt 方法打断正在睡眠的线程,这时 sleep 方法会抛出 InterruptedException
睡眠结束后的线程未必会立刻得到执行
建议用 TimeUnit 的 sleep 代替 Thread 的 sleep 来获得更好的可读性 。如:
1 2 3 4 sleep (1);sleep (1);Copy
yield (让出当前线程)
调用 yield 会让当前线程从 Running 进入 Runnable 就绪状态 (仍然有可能被执行),然后调度执行其它线程
具体的实现依赖于操作系统的任务调度器
线程优先级
(3)join()方法 用于等待某个线程结束。哪个线程内调用join()方法,就等待哪个线程结束,然后再去执行其他线程。
如在主线程中调用ti.join(),则是主线程等待t1线程结束
1 2 3 4 5 Thread thread = new Thread ();1000 );Copy
(4)interrupt()方法 用于打断阻塞 (sleep wait join…)的线程。 处于阻塞状态的线程,CPU不会给其分配时间片。
如果一个线程在在运行中被打断,打断标记会被置为true。
如果是打断因sleep wait join方法而被阻塞的线程,会将打断标记置为false
1 2 // 用于查看打断标记,返回值被boolean类型
正常运行的线程在被打断后,不会停止 ,会继续执行。如果要让线程在被打断后停下来,需要使用打断标记来判断 。
1 2 3 4 5 while (true ) {if (Thread .Thread() .isInterrupted() ) {
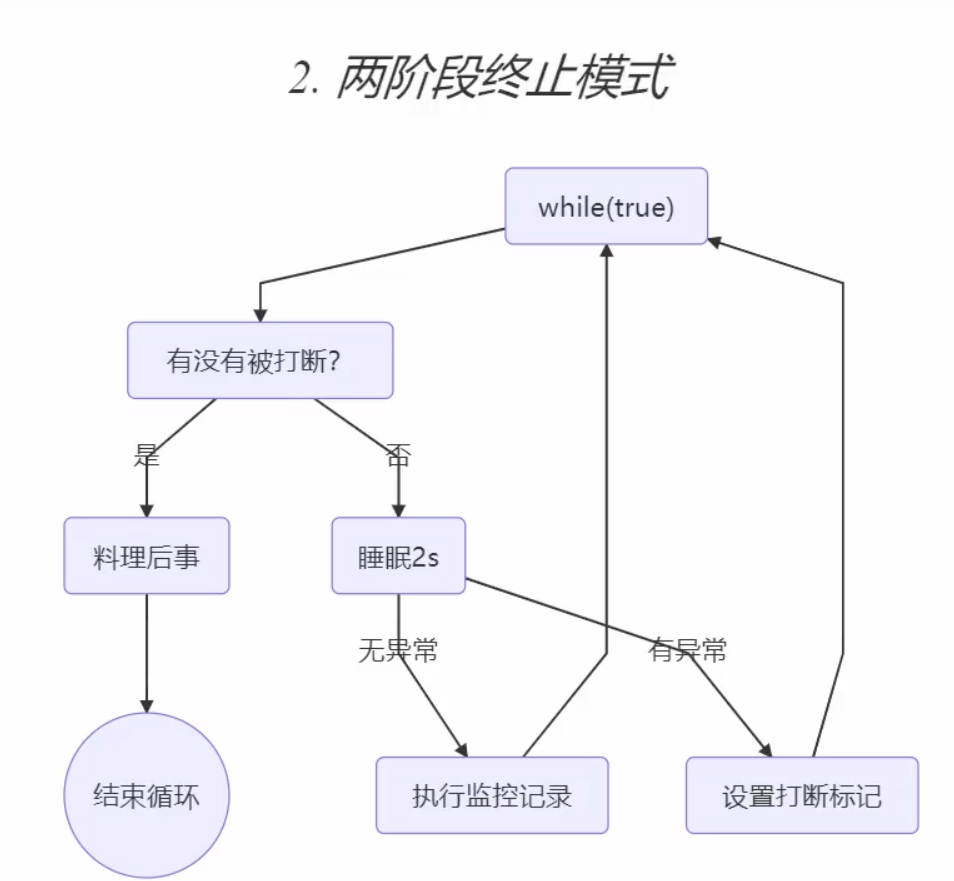
interrupt方法的应用 ——两阶段终止模式当我们在执行线程一时,想要终止线程二,这是就需要使用interrupt方法来优雅 的停止线程二。
代码
1 2 3 4 5 6 7 8 9 10 11 12 13 14 15 16 17 18 19 20 21 22 23 24 25 26 27 28 29 30 31 32 33 34 35 36 37 38 39 40 41 42 43 44 45 46 47 48 49 50 51 52 public class Test7 {public static void main (String[] args) throws InterruptedException {Monitor monitor = new Monitor ();3500 );class Monitor {public void start () {new Thread () {@Override public void run () {while (true ) {if (Thread.currentThread().isInterrupted()) {"处理后续任务" );break ;"监控器运行中..." );try {1000 );catch (InterruptedException e) {public void stop () {
(5)不推荐使用的打断方法
stop方法 停止线程运行(可能造成共享资源无法被释放,其他线程无法使用这些共享资源)
suspend(暂停线程)/resume(恢复线程)方法
(6)守护线程 当JAVA进程中有多个线程在执行时,只有当所有非守护线程都执行完毕后,JAVA进程才会结束。但当非守护线程全部执行完毕后,守护线程无论是否执行完毕,也会一同结束。
1 2 //将线程设置为守护线程, 默认为false monitor .setDaemon(true );Copy
守护线程的应用
垃圾回收器线程就是一种守护线程
Tomcat 中的 Acceptor 和 Poller 线程都是守护线程,所以 Tomcat 接收到 shutdown 命令后,不会等 待它们处理完当前请求
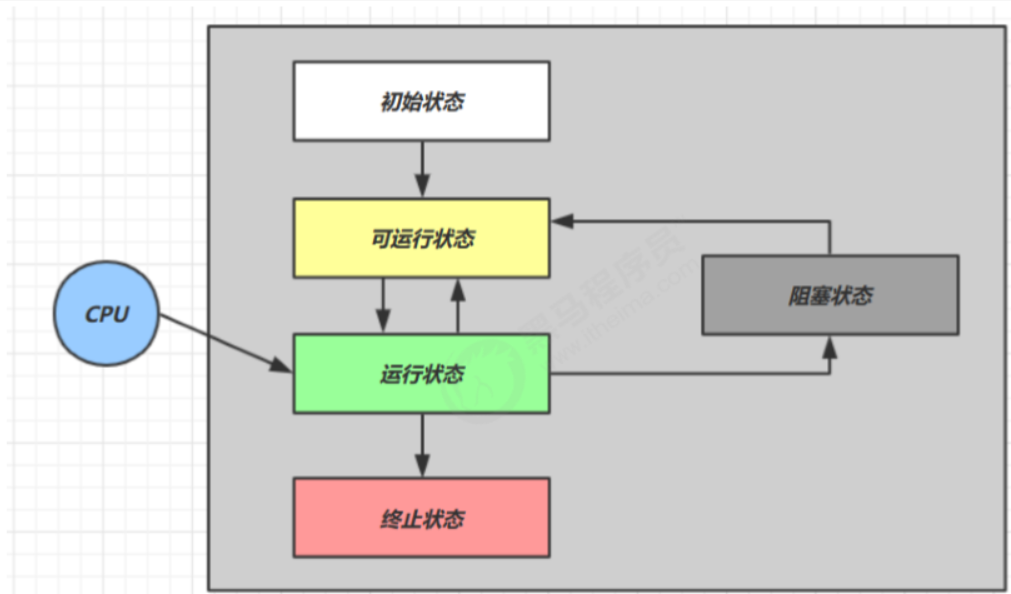
4、线程的状态 (1)五种状态 这是从 操作系统 层面来描述的
【初始状态】仅是在语言层面创建了线程对象,还未与操作系统线程关联(例如线程调用了start方法)
【可运行状态】(就绪状态)指该线程已经被创建(与操作系统线程关联),可以由 CPU 调度执行
【运行状态】指获取了 CPU 时间片运行中的状态
当 CPU 时间片用完,会从【运行状态】转换至【可运行状态】,会导致线程的上下文切换
【阻塞状态】
如果调用了阻塞 API,如 BIO 读写文件,这时该线程实际不会用到 CPU,会导致线程上下文切换,进入 【阻塞状态】
等 BIO 操作完毕,会由操作系统唤醒阻塞的线程,转换至【可运行状态】
与【可运行状态】的区别是,对【阻塞状态】的线程来说只要它们一直不唤醒,调度器就一直不会考虑调度它们
【终止状态】表示线程已经执行完毕,生命周期已经结束,不会再转换为其它状态
(2)六种状态 这是从 Java API 层面来描述的
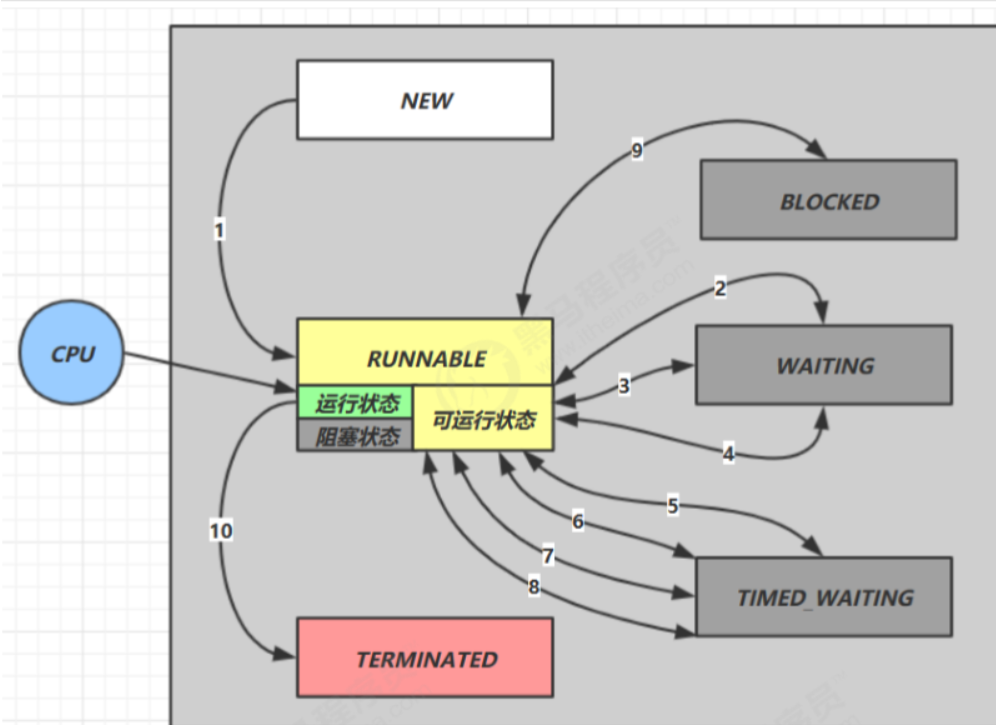
NEW 线程刚被创建,但是还没有调用 start() 方法RUNNABLE 当调用了 start() 方法之后,注意,Java API 层面的 RUNNABLE 状态涵盖了操作系统层面的 【可运行状态】、【运行状态】和【阻塞状态】(由于 BIO 导致的线程阻塞,在 Java 里无法区分,仍然认为 是可运行)BLOCKED , WAITING , TIMED_WAITING 都是 Java API 层面 对【阻塞状态】的细分,如sleep就位TIMED_WAITING, join为WAITING状态。后面会在状态转换一节详述。TERMINATED 当线程代码运行结束
三、共享模型之管程 1、共享带来的问题 (1)临界区 Critical Section
一个程序运行多个线程本身是没有问题的
问题出在多个线程访问共享资源
多个线程读共享资源其实也没有问题
在多个线程对共享资源读写操作时发生指令交错,就会出现问题
一段代码块内如果存在对共享资源的多线程读写操作,称这段代码块为临界区
1 2 3 4 5 6 7 8 9 10 11 12 13 static int counter = 0 ;static void increment () static void decrement ()
(2)竞态条件 Race Condition 多个线程在临界区 内执行,由于代码的执行序列不同而导致结果无法预测,称之为发生了竞态条件
2、synchronized 解决方案 (1)解决手段 为了避免临界区的竞态条件发生,有多种手段可以达到目的。
阻塞式的解决方案:synchronized,Lock
非阻塞式的解决方案:原子变量
本次课使用阻塞式的解决方案:synchronized ,来解决上述问题,即俗称的【对象锁】 ,它采用互斥的方式让同一 时刻至多只有一个线程能持有【对象锁】,其它线程再想获取这个【对象锁】时就会阻塞住(blocked)。这样就能保证拥有锁 的线程可以安全的执行临界区内的代码,不用担心线程上下文切换
(2)synchronized语法 1 2 3 synchronized (对象)
例:
1 2 3 4 5 6 7 8 9 10 11 12 13 14 15 16 17 18 19 20 21 22 23 24 25 26 27 static int counter = 0 ; static final Object room = new Object ();public static void main (String[] args) throws InterruptedException { Thread t1 = new Thread (() -> { for (int i = 0 ; i < 5000 ; i++) { synchronized (room) { "t1" );Thread t2 = new Thread (() -> { for (int i = 0 ; i < 5000 ; i++) { synchronized (room) { "t2" );"{}" ,counter);
(3)synchronized加在方法上
1 2 3 4 5 6 7 8 9 10 11 12 public class Demo {public synchronized void test () {public void test () {synchronized (this ) {
加在静态方法上
1 2 3 4 5 6 7 8 9 10 11 12 public class Demo {public synchronized static void test () {public void test () {synchronized (Demo.class) {
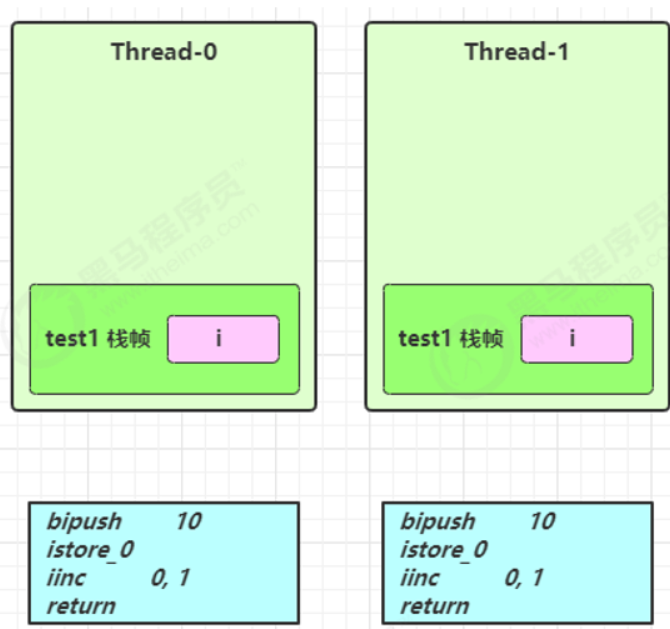
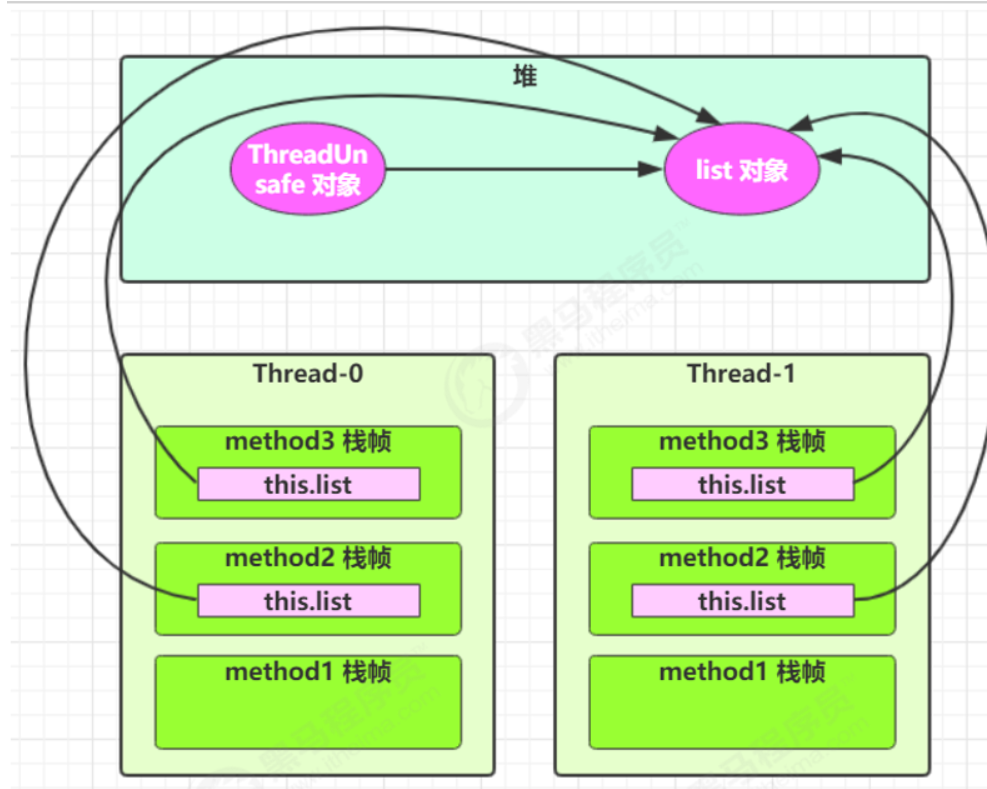
3、变量的线程安全分析 成员变量和静态变量是否线程安全?
如果它们没有共享,则线程安全
如果它们被共享了,根据它们的状态是否能够改变,又分两种情况
如果只有读操作,则线程安全
如果有读写操作,则这段代码是临界区,需要考虑线程安全
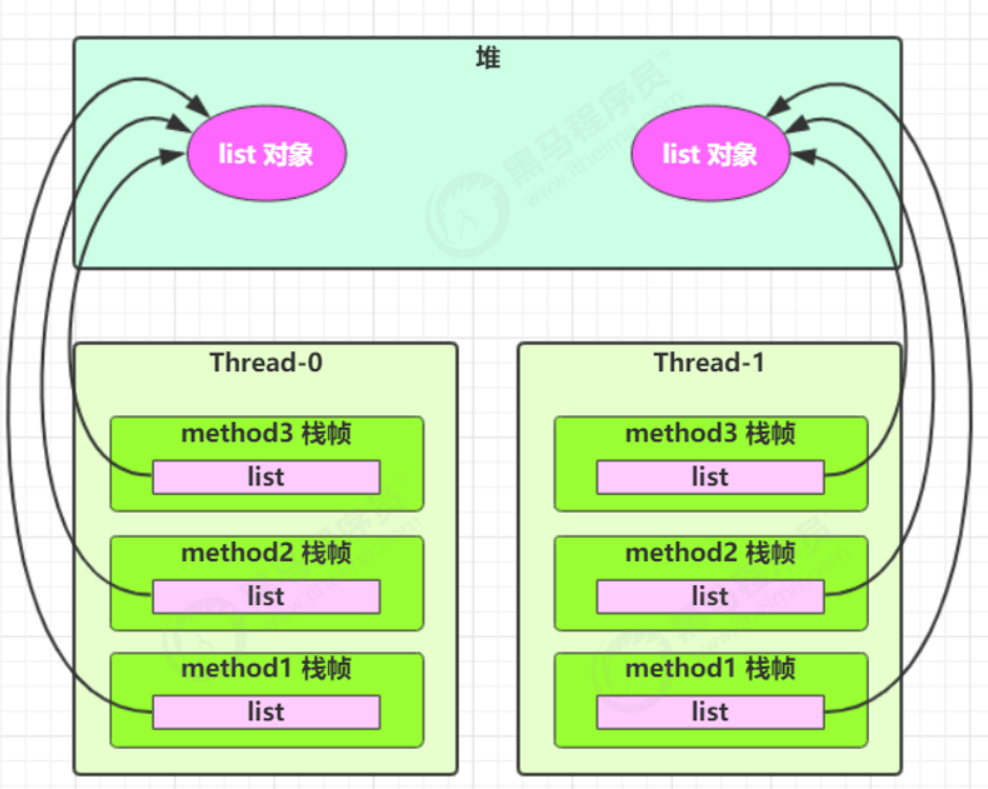
局部变量是否线程安全?
如果调用的对象被共享,且执行了读写操作,则线程不安全
如果是局部变量,则会在堆中创建对应的对象,不会存在线程安全问题。
常见线程安全类
String
Integer
StringBuffer
Random
Vector (List的线程安全实现类)
Hashtable (Hash的线程安全实现类)
java.util.concurrent 包下的类
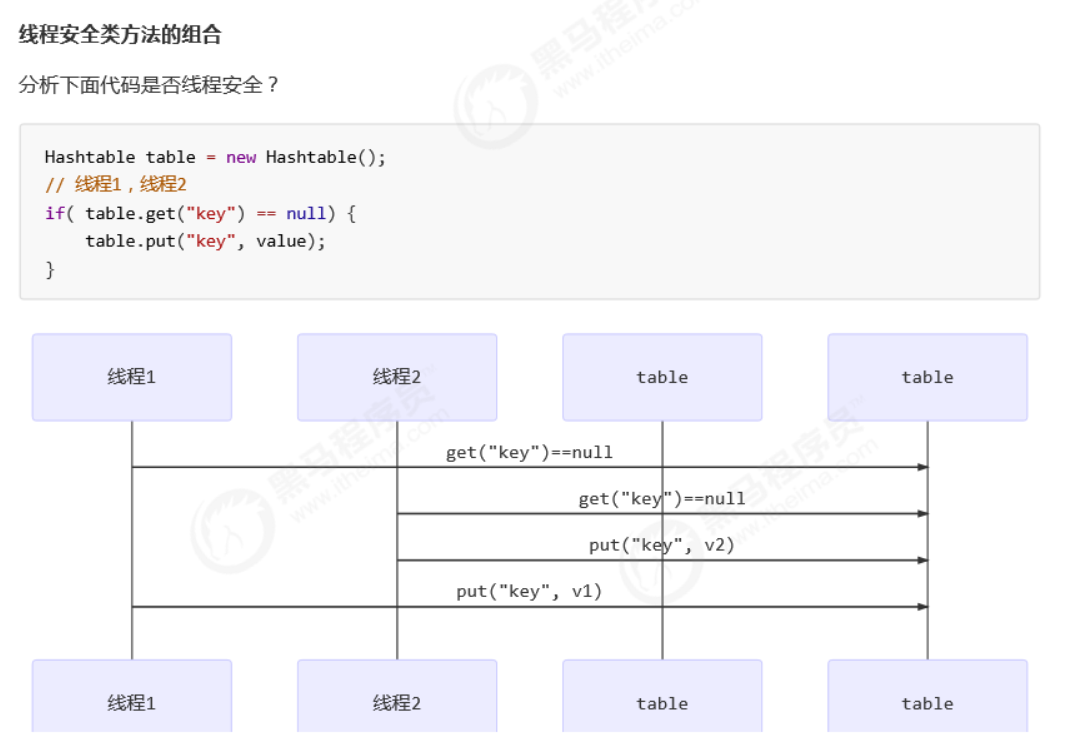
这里说它们是线程安全的是指,多个线程调用它们同一个实例的某个方法时 ,是线程安全的
它们的每个方法是原子的(都被加上了synchronized)
但注意它们多个方法的组合不是原子的 ,所以可能会出现线程安全问题
不可变类线程安全性 String、Integer 等都是不可变类 ,因为其内部的状态不可以改变,因此它们的方法都是线程安全的
有同学或许有疑问,String 有 replace,substring 等方法【可以】改变值啊,那么这些方法又是如何保证线程安 全的呢?
这是因为这些方法的返回值都创建了一个新的对象 ,而不是直接改变String、Integer对象本身。
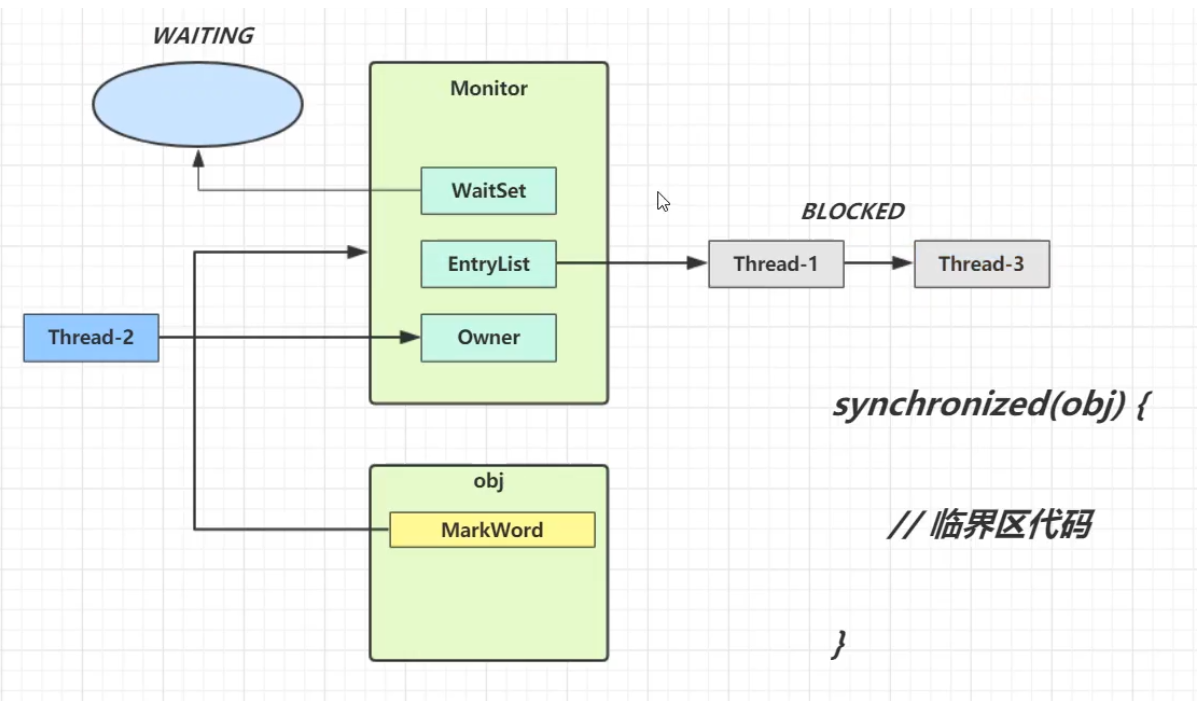
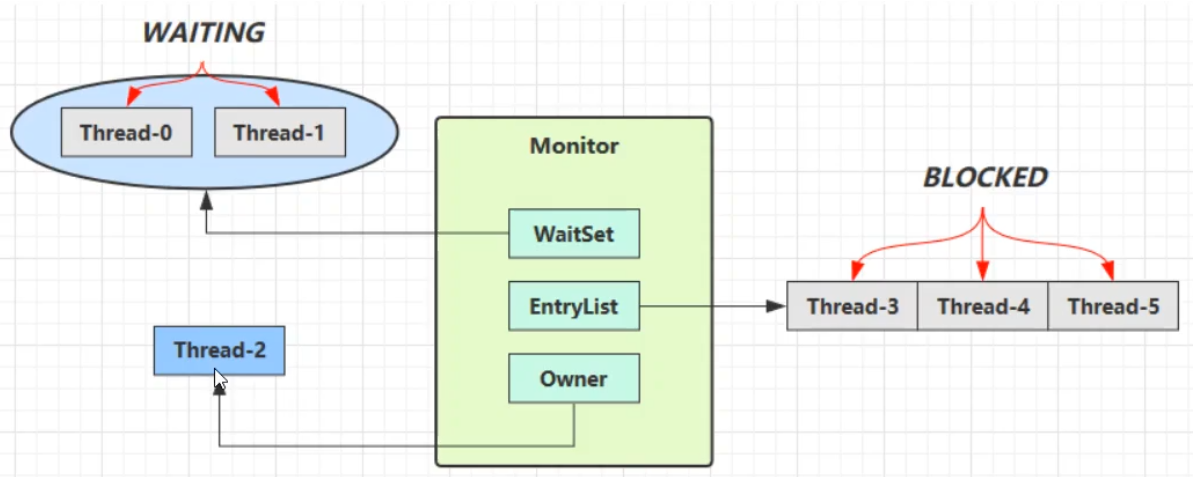
4、Monitor概念 每个对象 Object 都有monitor,所以Object wait、notify 对应 WAITING 状态;
Thread 的 join 调用 Object 到wait 方法
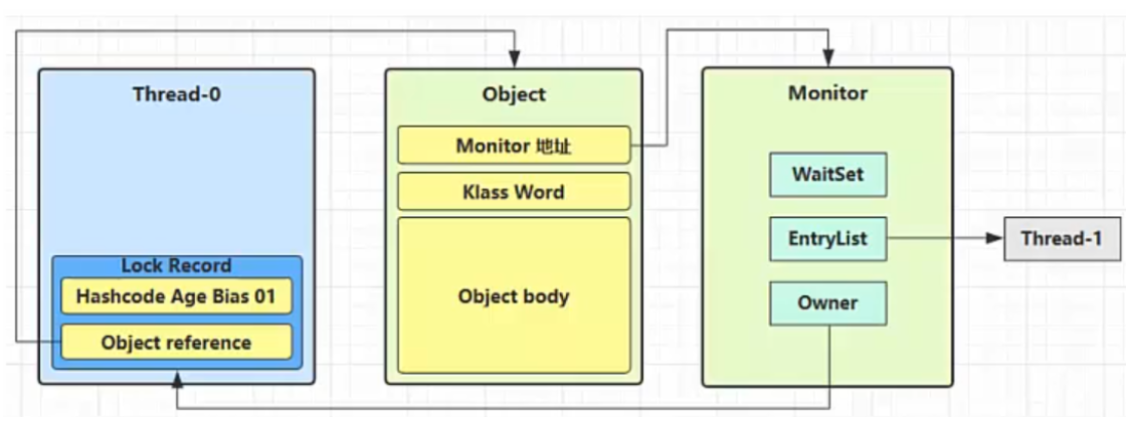
(1)原理之Monitor
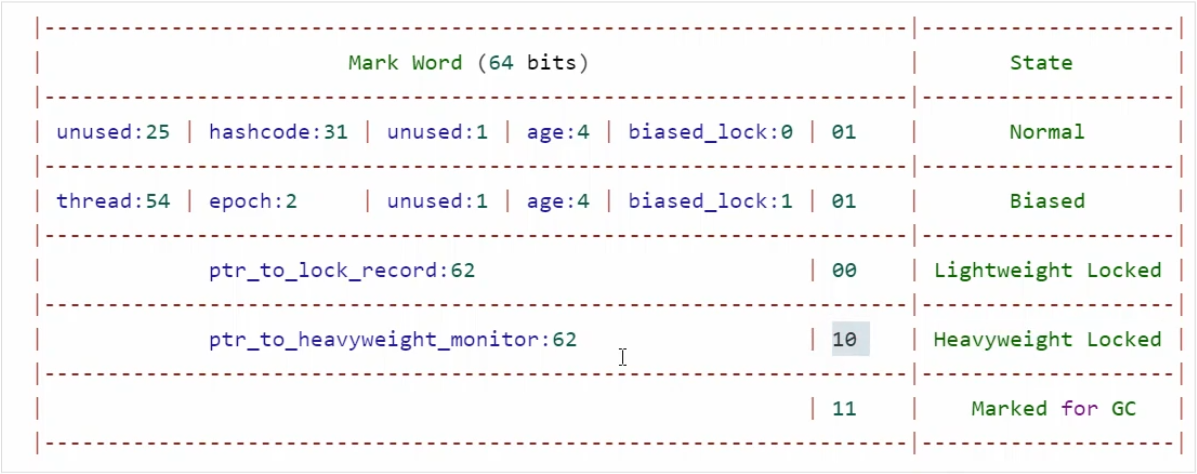
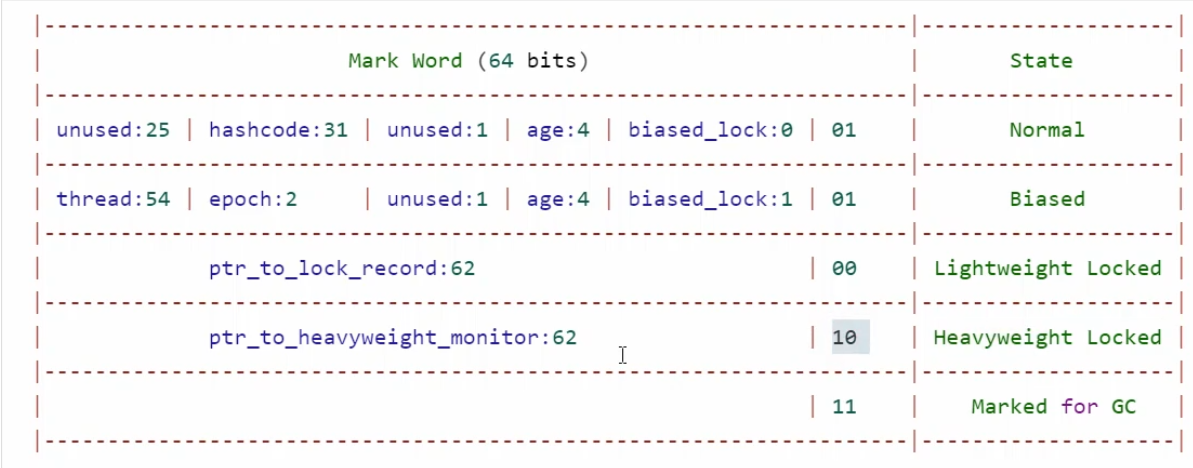
5、Synchronized原理进阶 对象头格式
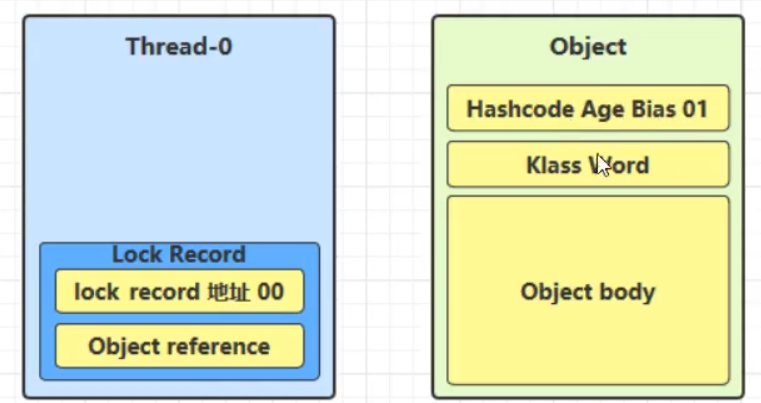
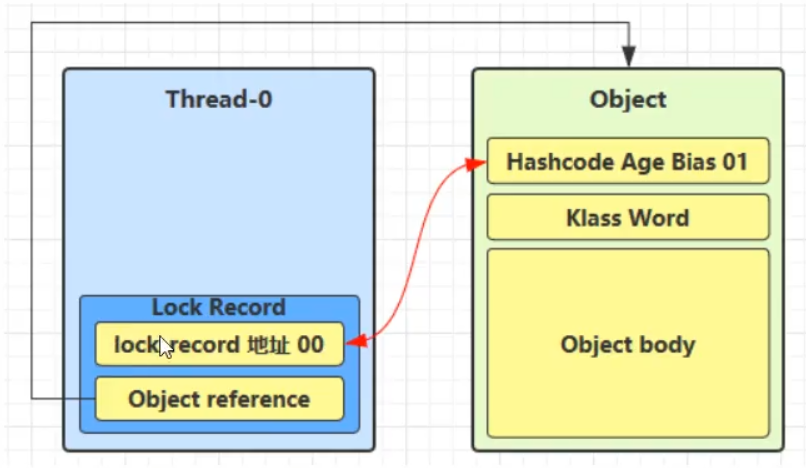
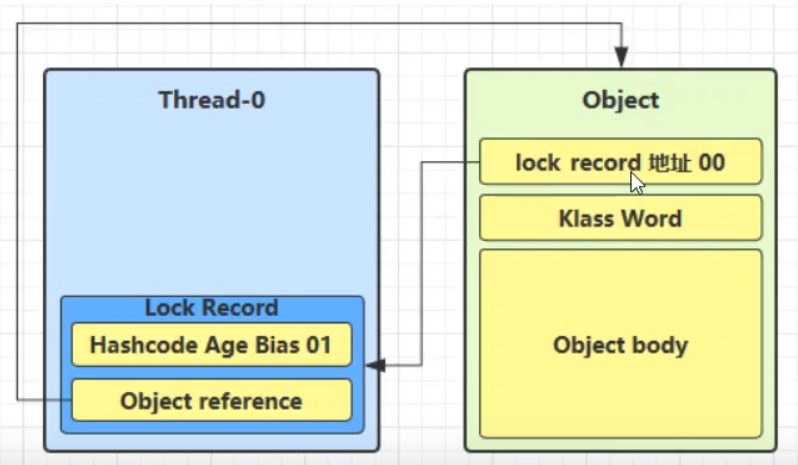
(1)轻量级锁(用于优化Monitor这类的重量级锁) 轻量级锁使用场景: 当一个对象被多个线程所访问,但访问的时间是错开的(不存在竞争) ,此时就可以使用轻量级锁 来优化。
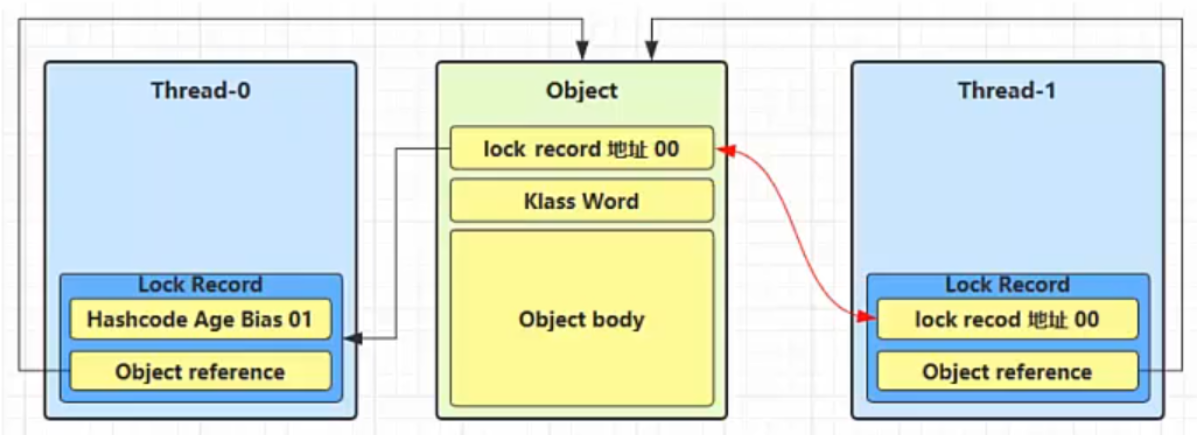
如果cas替换成功,则将Object的对象头替换为锁记录的地址 和状态 00(轻量级锁状态) ,并由该线程给对象加锁
(2)锁膨胀
如果一个线程在给一个对象加轻量级锁时,cas替换操作失败 (因为此时其他线程已经给对象加了轻量级锁),此时该线程就会进入锁膨胀 过程
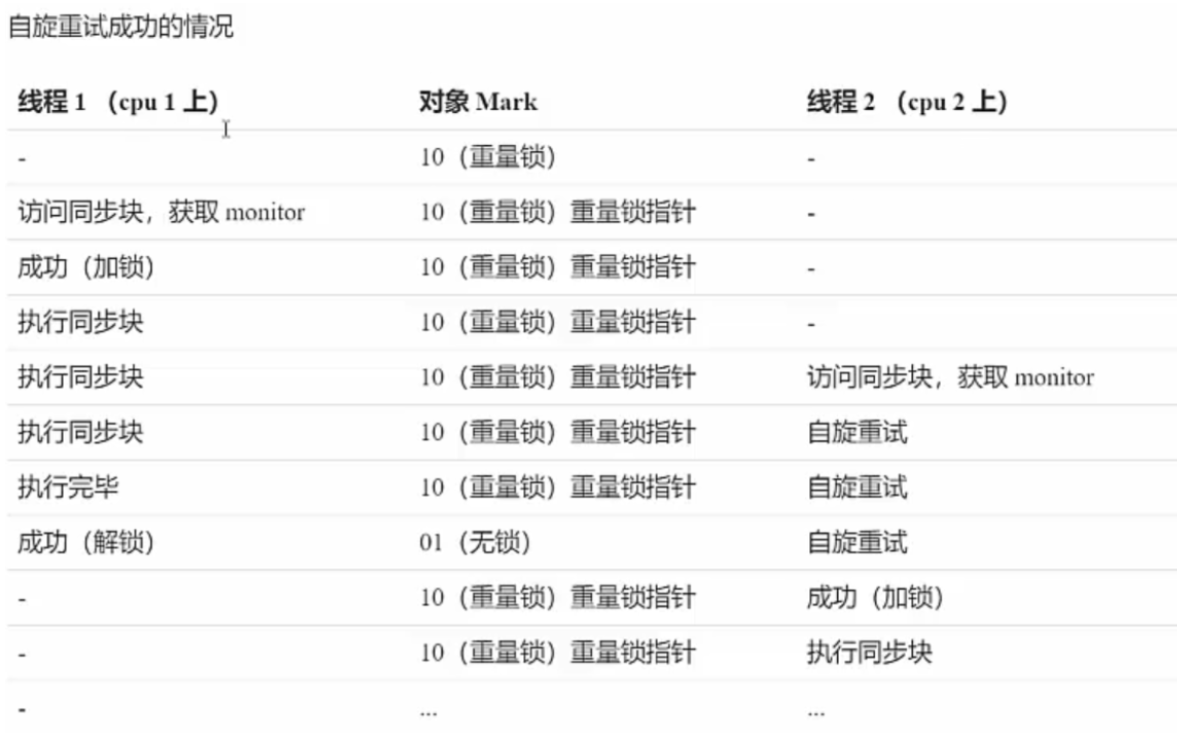
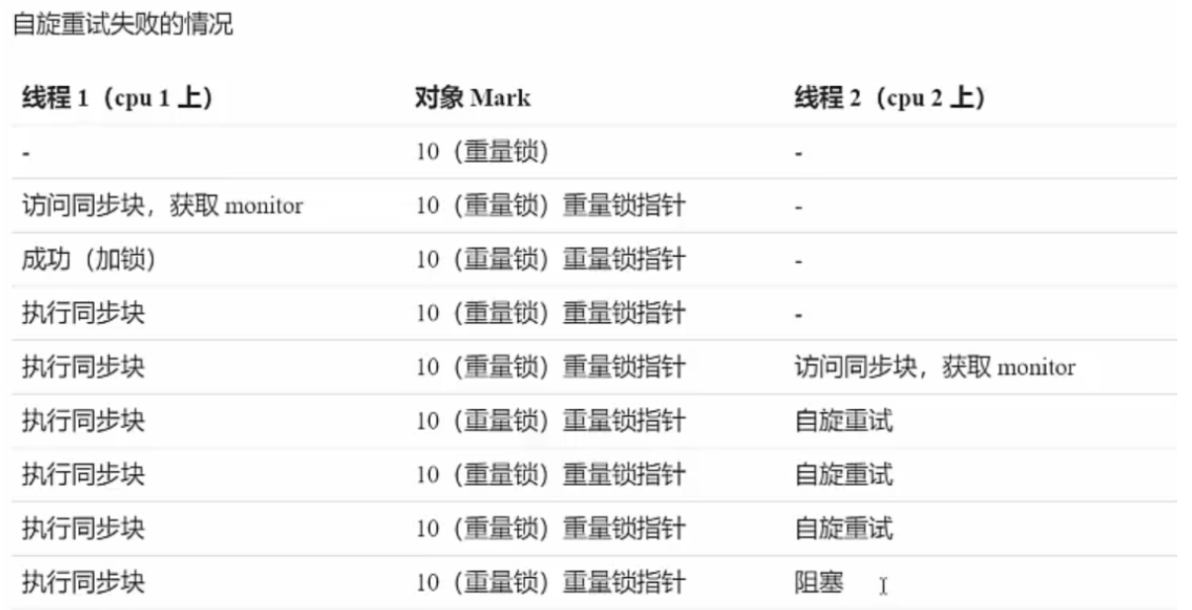
(3)自旋优化 重量级锁 竞争时,还可以使用自选来优化,如果当前线程在自旋成功 (使用锁的线程退出了同步块,释放了锁 ),这时就可以避免线程进入阻塞状态。
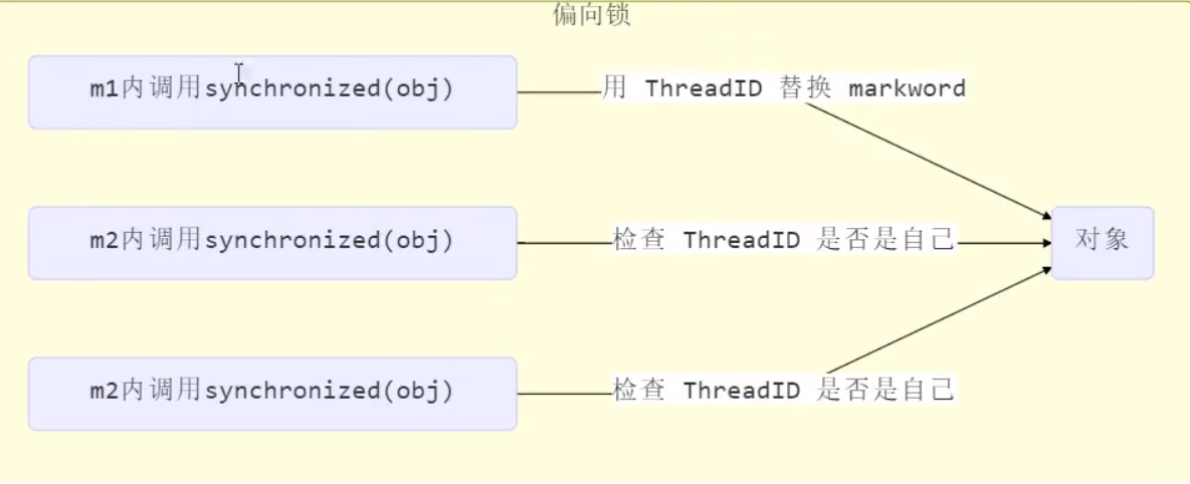
(4)偏向锁(用于优化轻量级锁重入) 轻量级锁在没有竞争时,每次重入 (该线程执行的方法中再次锁住该对象)操作仍需要cas替换操作,这样是会使性能降低的。
所以引入了偏向锁 对性能进行优化:在第一次 cas时会将线程的ID 写入对象的Mark Word中。此后发现这个线程ID就是自己的,就表示没有竞争,就不需要再次cas,以后只要不发生竞争,这个对象就归该线程所有。
偏向状态
Normal:一般状态,没有加任何锁,前面62位保存的是对象的信息,最后2位为状态(01),倒数第三位表示是否使用偏向锁(未使用:0)
Biased:偏向状态,使用偏向锁,前面54位保存的当前线程的ID,最后2位为状态(01),倒数第三位表示是否使用偏向锁(使用:1)
Lightweight:使用轻量级锁,前62位保存的是锁记录的指针,最后两位为状态(00)
Heavyweight:使用重量级锁,前62位保存的是Monitor的地址指针,后两位为状态(10)
如果开启了偏向锁(默认开启),在创建对象时,对象的Mark Word后三位应该是101
但是偏向锁默认是有延迟 的,不会再程序一启动就生效,而是会在程序运行一段时间(几秒之后),才会对创建的对象设置为偏向状态
如果没有开启偏向锁,对象的Mark Word后三位应该是001
撤销偏向 以下几种情况会使对象的偏向锁失效
调用对象的hashCode方法
多个线程使用该对象
调用了wait/notify方法 (调用wait方法会导致锁膨胀而使用重量级锁 )
(5)批量重偏向
如果对象虽然被多个线程访问,但是线程间不存在竞争,这时偏向T1的对象仍有机会重新偏向T2
当撤销超过20次后(超过阈值),JVM会觉得是不是偏向错了,这时会在给对象加锁时,重新偏向至加锁线程。
(6)批量撤销 当撤销偏向锁的阈值超过40以后,就会将整个类的对象都改为不可偏向的
6、Wait/Notify (1)原理
注:只有当对象被锁以后,才能调用wait和notify方法
1 2 3 4 5 6 7 8 9 public class Test1 {final static Object LOCK = new Object ();public static void main (String[] args) throws InterruptedException {synchronized (LOCK) {
(2)Wait与Sleep的区别 不同点
Sleep是Thread类的静态方法,Wait是Object的方法,Object又是所有类的父类,所以所有类都有Wait方法。
Sleep在阻塞的时候不会释放锁,而Wait在阻塞的时候会释放锁
Sleep不需要与synchronized一起使用,而Wait需要与synchronized一起使用(对象被锁以后才能使用)
相同点
(3)优雅地使用wait/notify 什么时候适合使用wait
当线程不满足某些条件 ,需要暂停运行时,可以使用wait。这样会将对象的锁释放 ,让其他线程能够继续运行。如果此时使用sleep,会导致所有线程都进入阻塞,导致所有线程都没法运行,直到当前线程sleep结束后,运行完毕,才能得到执行。
使用wait/notify需要注意什么
当有多个 线程在运行时,对象调用了wait方法,此时这些线程都会进入WaitSet中等待。如果这时使用了notify 方法,可能会造成虚假唤醒 (唤醒的不是满足条件的等待线程),这时就需要使用notifyAll 方法
1 2 3 4 5 6 7 8 9 10 11 synchronized (LOCK) {while (synchronized (LOCK) {
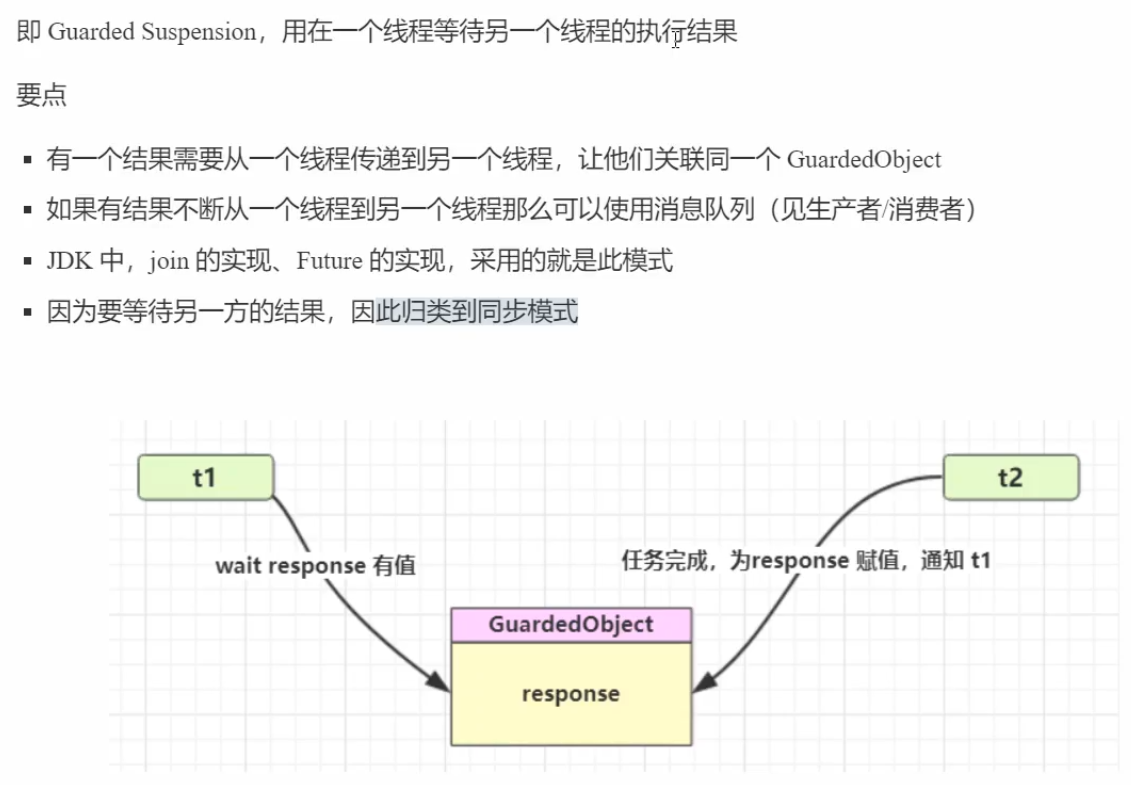
7、模式之保护性暂停 (1)定义
(2)举例 1 2 3 4 5 6 7 8 9 10 11 12 13 14 15 16 17 18 19 20 21 22 23 24 25 26 27 28 29 30 31 32 33 34 35 36 37 38 39 40 41 42 43 44 45 46 47 48 49 50 51 52 53 54 55 56 57 public class Test2 {public static void main (String[] args) {String hello = "hello thread!" ;Guarded guarded = new Guarded ();new Thread (()->{"想要得到结果" );synchronized (guarded) {"结果是:" +guarded.getResponse());"得到结果" );new Thread (()->{"设置结果" );synchronized (guarded) {class Guarded {private Object response;public Object getResponse () {while (response == null ) {synchronized (this ) {try {this .wait();catch (InterruptedException e) {return response;public void setResponse (Object response) {this .response = response;synchronized (this ) {this .notifyAll();@Override public String toString () {return "Guarded{" +"response=" + response +'}' ;
带超时判断的暂停
1 2 3 4 5 6 7 8 9 10 11 12 13 14 15 16 17 18 19 20 21 22 23 24 public Object getResponse (long time) {synchronized (this ) {long currentTime = System.currentTimeMillis();long passedTime = 0 ;while (response == null ) {long waitTime = time -passedTime;if (waitTime <= 0 ) {break ;try {this .wait(waitTime);catch (InterruptedException e) {return response;
(3)join源码——使用保护性暂停模式 1 2 3 4 5 6 7 8 9 10 11 12 13 14 15 16 17 18 19 20 21 22 23 24 public final synchronized void join (long millis) throws InterruptedException {long base = System.currentTimeMillis();long now = 0 ;if (millis < 0 ) {throw new IllegalArgumentException ("timeout value is negative" );if (millis == 0 ) {while (isAlive()) {0 );else {while (isAlive()) {long delay = millis - now;if (delay <= 0 ) {break ;
8、park/unpark (1)基本使用 park/unpark都是LockSupport类中的的方法
1 2 3 4 5 6 7 8 9 10 11 12 13 14 15 16 17 18 19 public static void main (String[] args) throws InterruptedException {Thread thread = new Thread (()-> {"park" );"resume" );"t1" );1000 );"unpark" );
(2)特点 与wait/notify的区别
wait,notify 和 notifyAll 必须配合Object Monitor 一起使用,而park,unpark不必
park ,unpark 是以线程为单位 来阻塞 和唤醒 线程,而 notify 只能随机唤醒一个等待线程,notifyAll 是唤醒所有等待线程,就不那么精确
park & unpark 可以先 unpark ,而 wait & notify 不能先 notify
park不会释放锁 ,而wait会释放锁
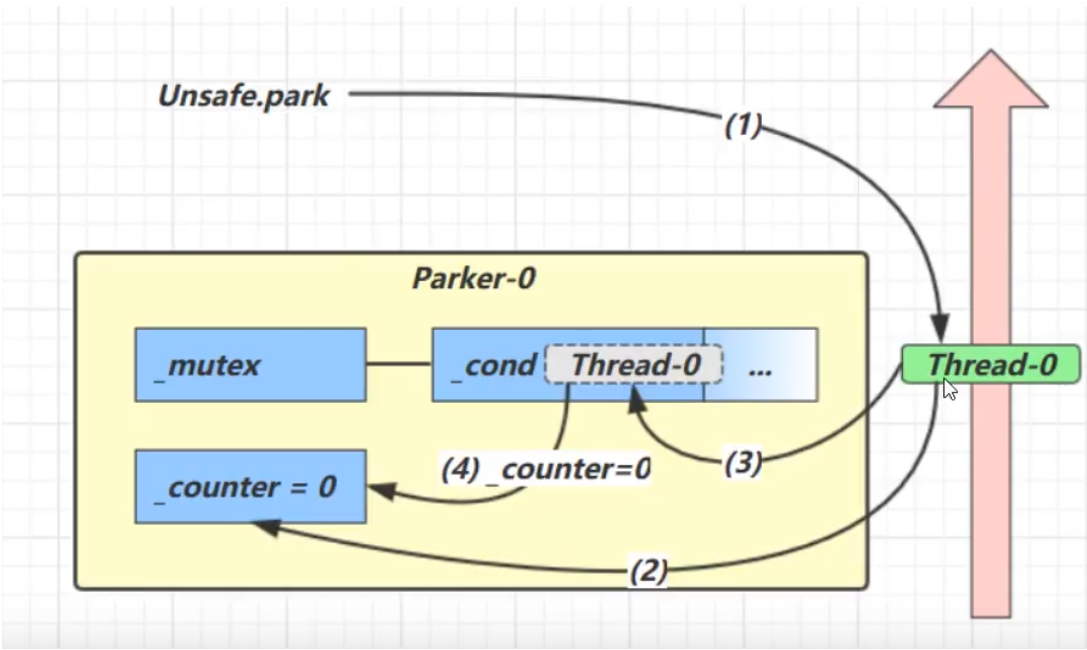
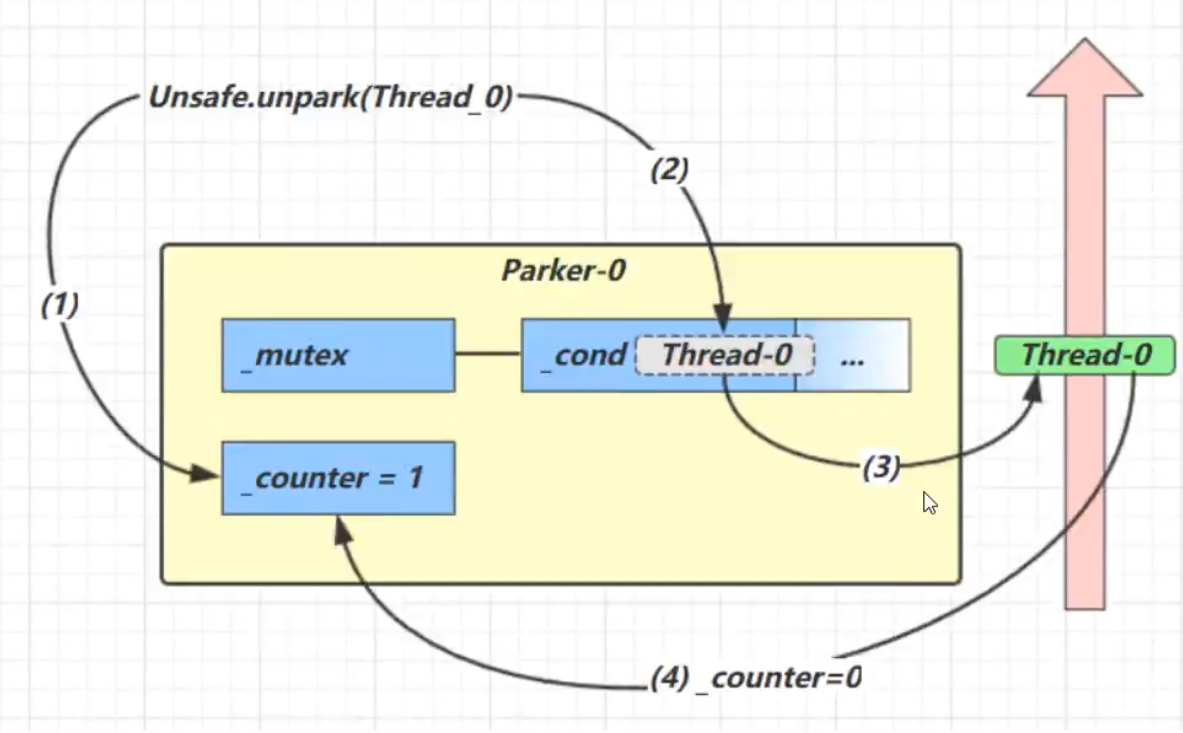
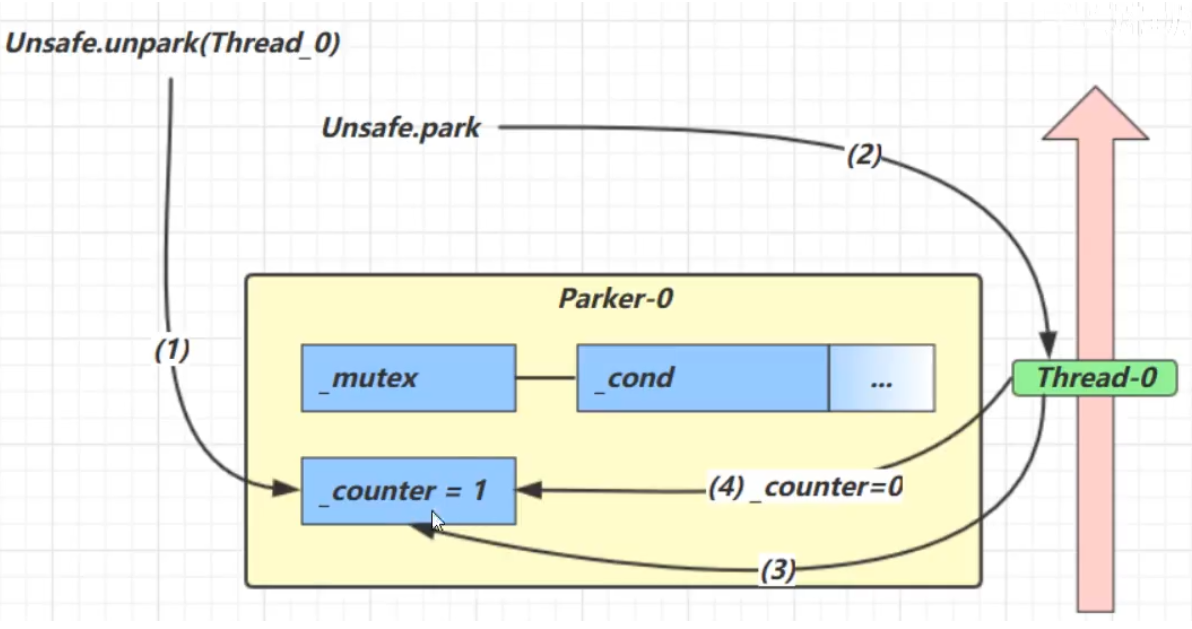
(3)原理 每个线程都有一个自己的Park对象 ,并且该对象**_counter, _cond,__mutex**组成
先调用park再调用unpark时
先调用park
线程运行时,会将Park对象中的**_counter的值设为0**;
调用park时,会先查看counter的值是否为0,如果为0,则将线程放入阻塞队列cond中
放入阻塞队列中后,会再次 将counter设置为0
然后调用unpark
先调用unpark,再调用park
调用unpark
调用park方法
查看counter是否为0
因为unpark已经把counter设置为1,所以此时将counter设置为0,但不放入 阻塞队列cond中
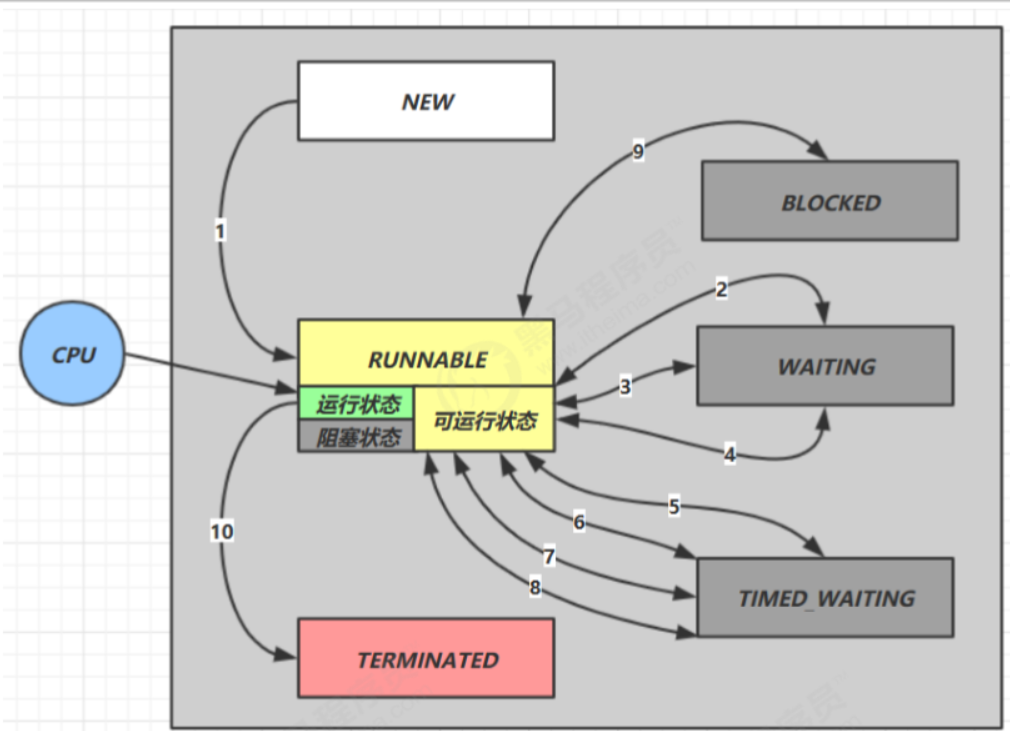
9、线程中的状态转换
情况一:NEW –> RUNNABLE
当调用了t.start()方法时,由 NEW –> RUNNABLE
情况二: RUNNABLE <–> WAITING
当调用了t 线程用 synchronized(obj) 获取了对象锁后 (锁线程对象 Monitor)
调用 obj.wait() 方法时,t 线程从 RUNNABLE –> WAITING
调用 obj.notify() , obj.notifyAll() , t.interrupt() 时
竞争锁成功,t 线程从 WAITING –> RUNNABLE
竞争锁失败,t 线程从 WAITING –> BLOCKED
情况三:RUNNABLE <–> WAITING
情况四: RUNNABLE <–> WAITING
当前线程调用 LockSupport.park() 方法会让当前线程从 RUNNABLE –> WAITING
调用 LockSupport.unpark(目标线程) 或调用了线程 的 interrupt() ,会让目标线程从 WAITING –> RUNNABLE
情况五: RUNNABLE <–> TIMED_WAITING t 线程用 synchronized(obj) 获取了对象锁后
调用 obj.wait(long n ) 方法时,t 线程从 RUNNABLE –> TIMED_WAITING (等待n后自动退出、被唤醒自动退出)
t 线程等待时间超过了 n 毫秒,或调用 obj.notify() , obj.notifyAll() , t.interrupt() 时
竞争锁成功,t 线程从 TIMED_WAITING –> RUNNABLE
竞争锁失败,t 线程从 TIMED_WAITING –> BLOCKED
情况六:RUNNABLE <–> TIMED_WAITING
情况七:RUNNABLE <–> TIMED_WAITING
当前线程调用 Thread.sleep(long n) ,当前线程从 RUNNABLE –> TIMED_WAITING
当前线程等待时间超过了 n 毫秒,当前线程从 TIMED_WAITING –> RUNNABLE
情况八:RUNNABLE <–> TIMED_WAITING
当前线程调用 LockSupport.parkNanos(long nanos) 或 LockSupport.parkUntil(long millis) 时,当前线 程从 RUNNABLE –> TIMED_WAITING
调用 LockSupport.unpark(目标线程) 或调用了线程 的 interrupt() ,或是等待超时,会让目标线程从 TIMED_WAITING–> RUNNABLE
情况九:RUNNABLE <–> BLOCKED
t 线程用 synchronized(obj) 获取了对象锁时如果竞争失败 ,从 RUNNABLE –> BLOCKED
持 obj 锁线程的同步代码块执行完毕,会唤醒该对象上所有 BLOCKED 的线程重新竞争,如果其中 t 线程竞争 成功,从 BLOCKED –> RUNNABLE ,其它失败 的线程仍然 BLOCKED
情况十: RUNNABLE <–> TERMINATED 当前线程所有代码运行完毕 ,进入 TERMINATED
10、多把锁 将锁的粒度细分
1 2 3 4 5 class BigRoom {private final Object studyRoom = new Object ();private final Object bedRoom = new Object ();
11、活跃性 (1)定义 因为某种原因,使得代码一直无法执行完毕,这样的现象叫做活跃性
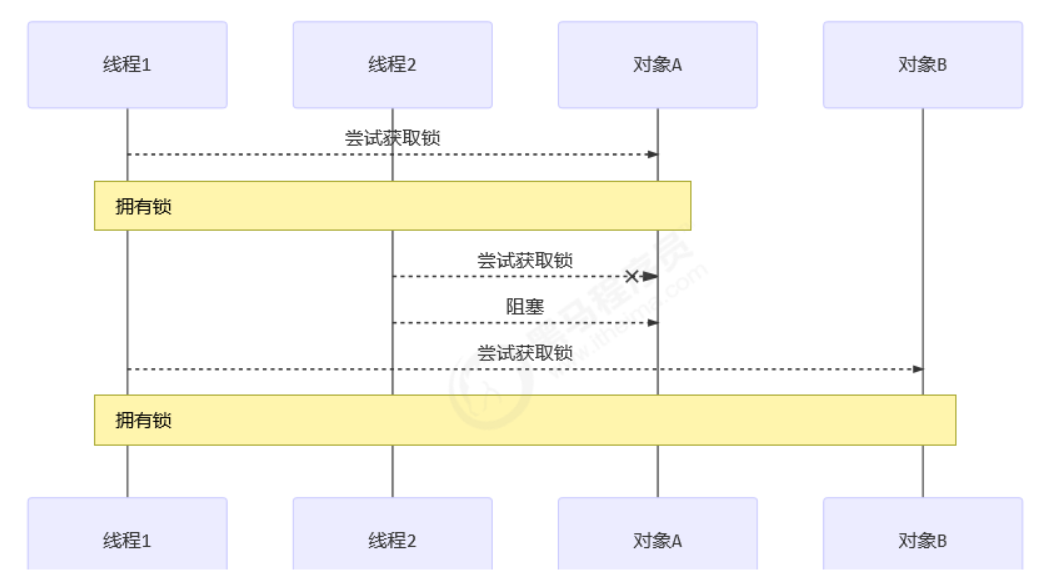
(2)死锁 有这样的情况:一个线程需要同时获取多把锁 ,这时就容易发生死锁
如:t1线程获得A对象 锁,接下来想获取B对象的锁t2线程获得B对象锁,接下来想获取A对象的锁
1 2 3 4 5 6 7 8 9 10 11 12 13 14 15 16 17 18 19 20 21 22 23 24 25 26 27 28 29 public static void main (String[] args) {final Object A = new Object ();final Object B = new Object ();new Thread (()->{synchronized (A) {try {2000 );catch (InterruptedException e) {synchronized (B) {new Thread (()->{synchronized (B) {try {1000 );catch (InterruptedException e) {synchronized (A) {
发生死锁的必要条件
互斥条件
请求和保持条件
进程已经拥有了至少一种资源,同时又去申请其他资源。因为其他资源被别的进程所使用,该进程进入阻塞状态,并且不释放自己已有的资源
不可抢占条件
进程对已获得的资源在未使用完成前不能被强占,只能在进程使用完后自己释放
循环等待条件
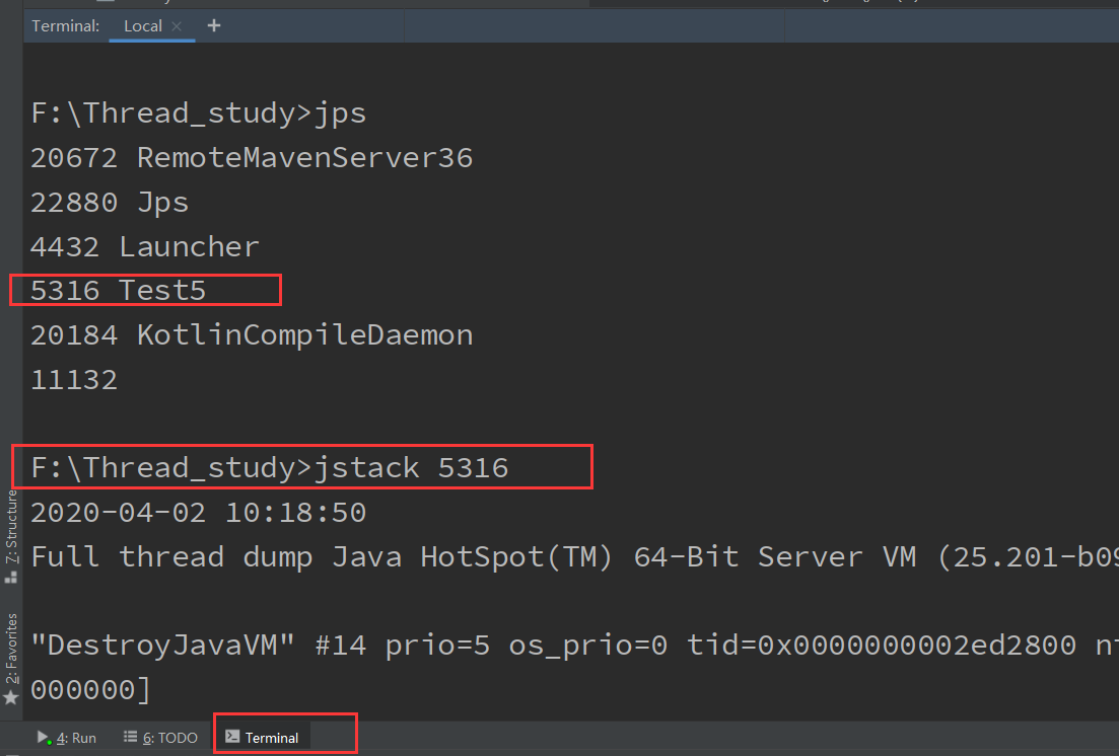
定位死锁的方法
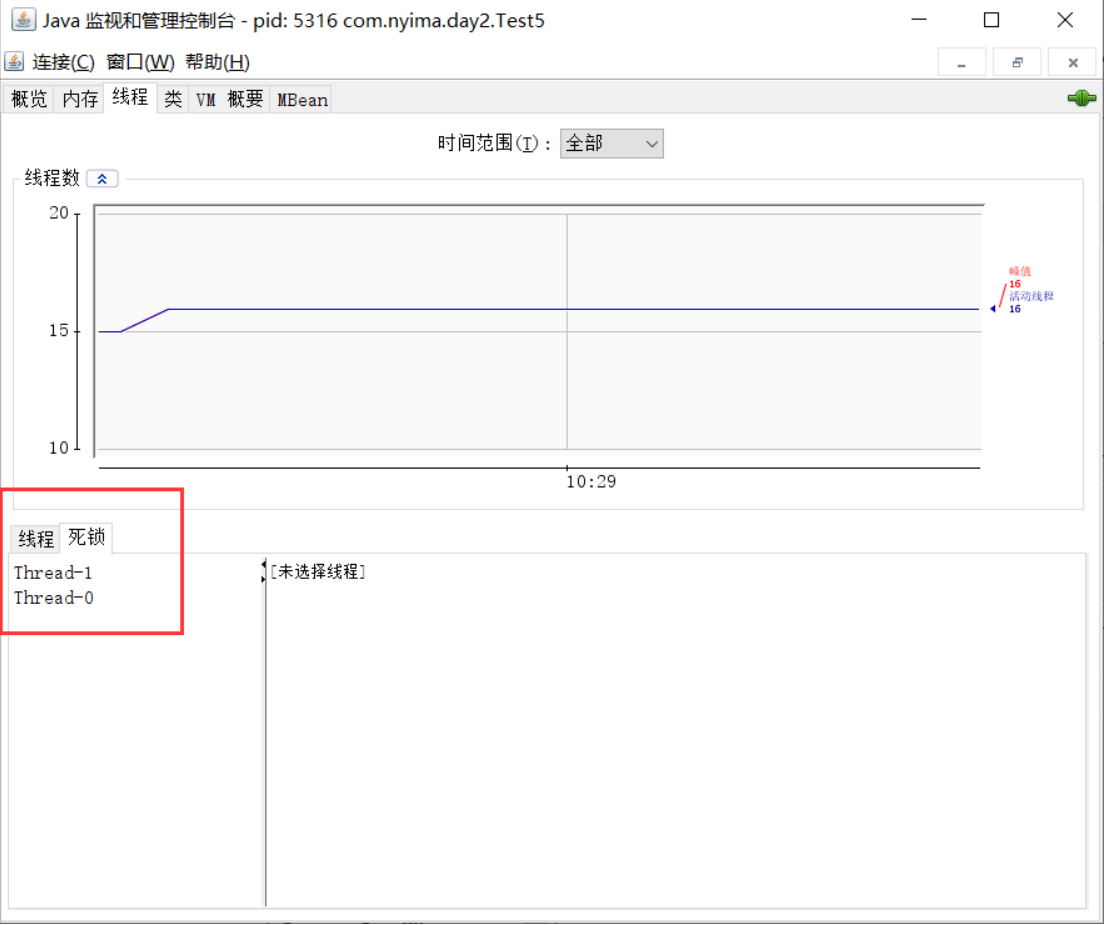
1 2 3 4 5 6 7 8 9 F:\Thread_study>jps20672 RemoteMavenServer3622880 Jps4432 Launcher5316 Test520184 KotlinCompileDaemon11132
打印的结果
1 2 3 4 5 6 7 8 9 //找到一个java级别的死锁"Thread-1" : monitor 0x0000000017f40de8 (object 0x00000000d6188880, a java.lang.Object),"Thread-0" "Thread-0" : monitor 0x0000000017f43678 (object 0x00000000d6188890, a java.lang.Object),"Thread-1" Copy
jconsole检测死锁
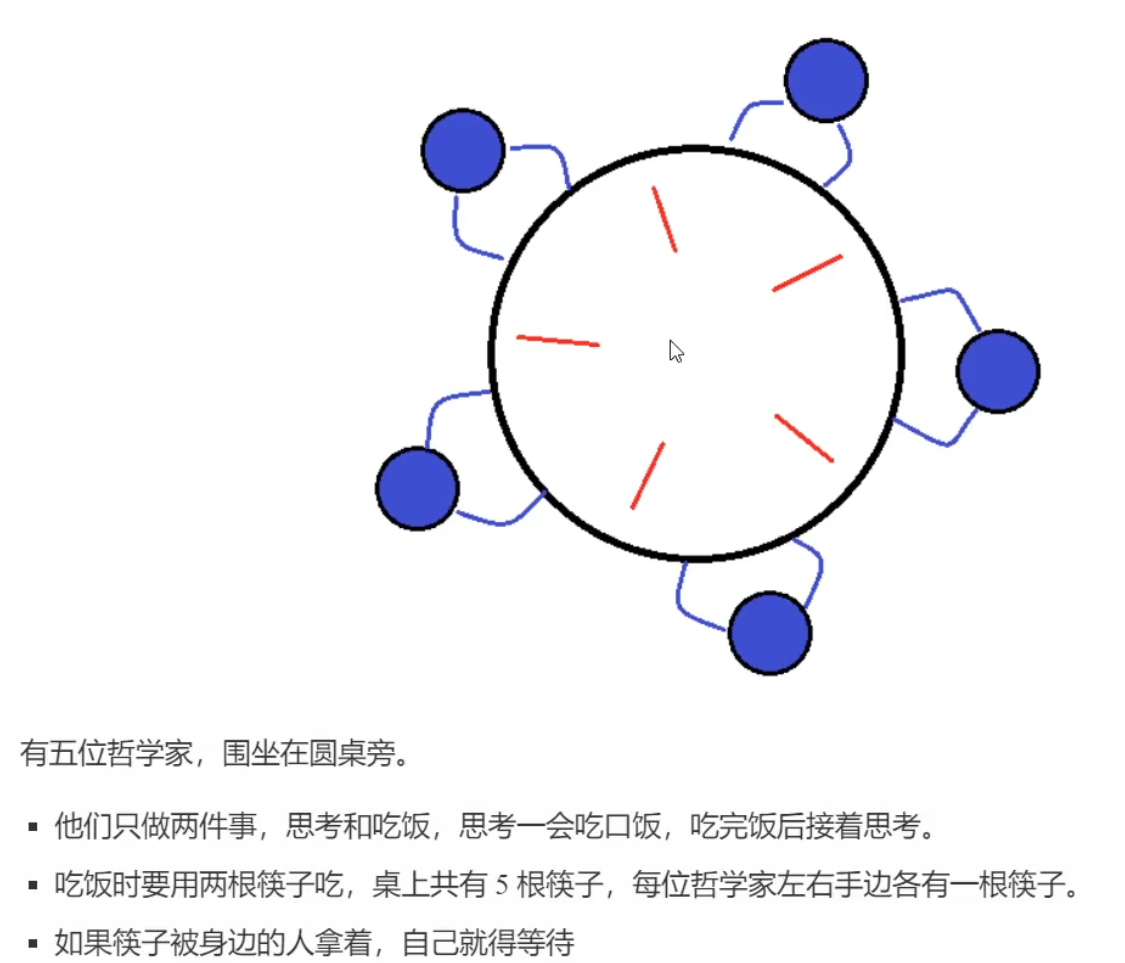
哲学家就餐问题
避免死锁的方法 在线程使用锁对象时,顺序加锁 即可避免死锁
(3)活锁 活锁出现在两个线程互相改变对方的结束条件 ,后谁也无法结束。
避免活锁的方法 在线程执行时,中途给予不同的间隔时间 即可。
死锁与活锁的区别
死锁是因为线程互相持有对象想要的锁,并且都不释放,最后到时线程阻塞 ,停止运行 的现象。
活锁是因为线程间修改了对方的结束条件,而导致代码一直在运行 ,却一直运行不完 的现象。
(4)饥饿 某些线程因为优先级太低,导致一直无法获得资源的现象。
在使用顺序加锁时,可能会出现饥饿现象
12、ReentrantLock 和synchronized相比具有的的特点
可中断
可以设置超时时间
可以设置为公平锁 (先到先得)
支持多个条件变量( 具有多个 waitset)
基本语法
1 2 3 4 5 6 7 8 9 10 private ReentrantLock lock = new ReentrantLock();lock .lock ();try {finally {lock .unlock();
可重入
可重入是指同一个线程如果首次获得了这把锁,那么因为它是这把锁的拥有者,因此有权利再次获取这把锁
如果是不可重入锁,那么第二次获得锁时,自己也会被锁挡住
可打断 如果某个线程处于阻塞状态,可以调用其interrupt方法让其停止阻塞,获得锁失败
简而言之 就是:处于阻塞状态的线程,被打断了就不用阻塞了,直接停止运行
1 2 3 4 5 6 7 8 9 10 11 12 13 14 15 16 17 18 19 20 21 22 23 24 25 26 27 28 29 public static void main (String[] args) {ReentrantLock lock = new ReentrantLock ();Thread t1 = new Thread (()-> {try {catch (InterruptedException e) {return ;finally {try {1000 );catch (InterruptedException e) {finally {
锁超时 使用lock.tryLock 方法会返回获取锁是否成功。如果成功则返回true,反之则返回false。
并且tryLock方法可以指定等待时间 ,参数为:tryLock(long timeout, TimeUnit unit), 其中timeout为最长等待时间,TimeUnit为时间单位
简而言之 就是:获取失败了、获取超时了或者被打断了,不再阻塞,直接停止运行
不设置等待时间
1 2 3 4 5 6 7 8 9 10 11 12 13 14 15 16 17 18 19 20 21 22 23 24 public static void main (String[] args) {ReentrantLock lock = new ReentrantLock ();Thread t1 = new Thread (()-> {if (!lock.tryLock()) {"获取失败" );return ;"得到了锁" );try {3000 );catch (InterruptedException e) {finally {
设置等待时间
1 2 3 4 5 6 7 8 9 10 11 12 13 14 15 16 17 18 19 20 21 22 23 24 25 26 27 28 29 30 31 32 33 public static void main (String[] args) {ReentrantLock lock = new ReentrantLock ();Thread t1 = new Thread (()-> {try {if (!lock.tryLock(1 , TimeUnit.SECONDS)) {"获取失败" );return ;catch (InterruptedException e) {return ;"得到了锁" );try {3000 );catch (InterruptedException e) {finally {
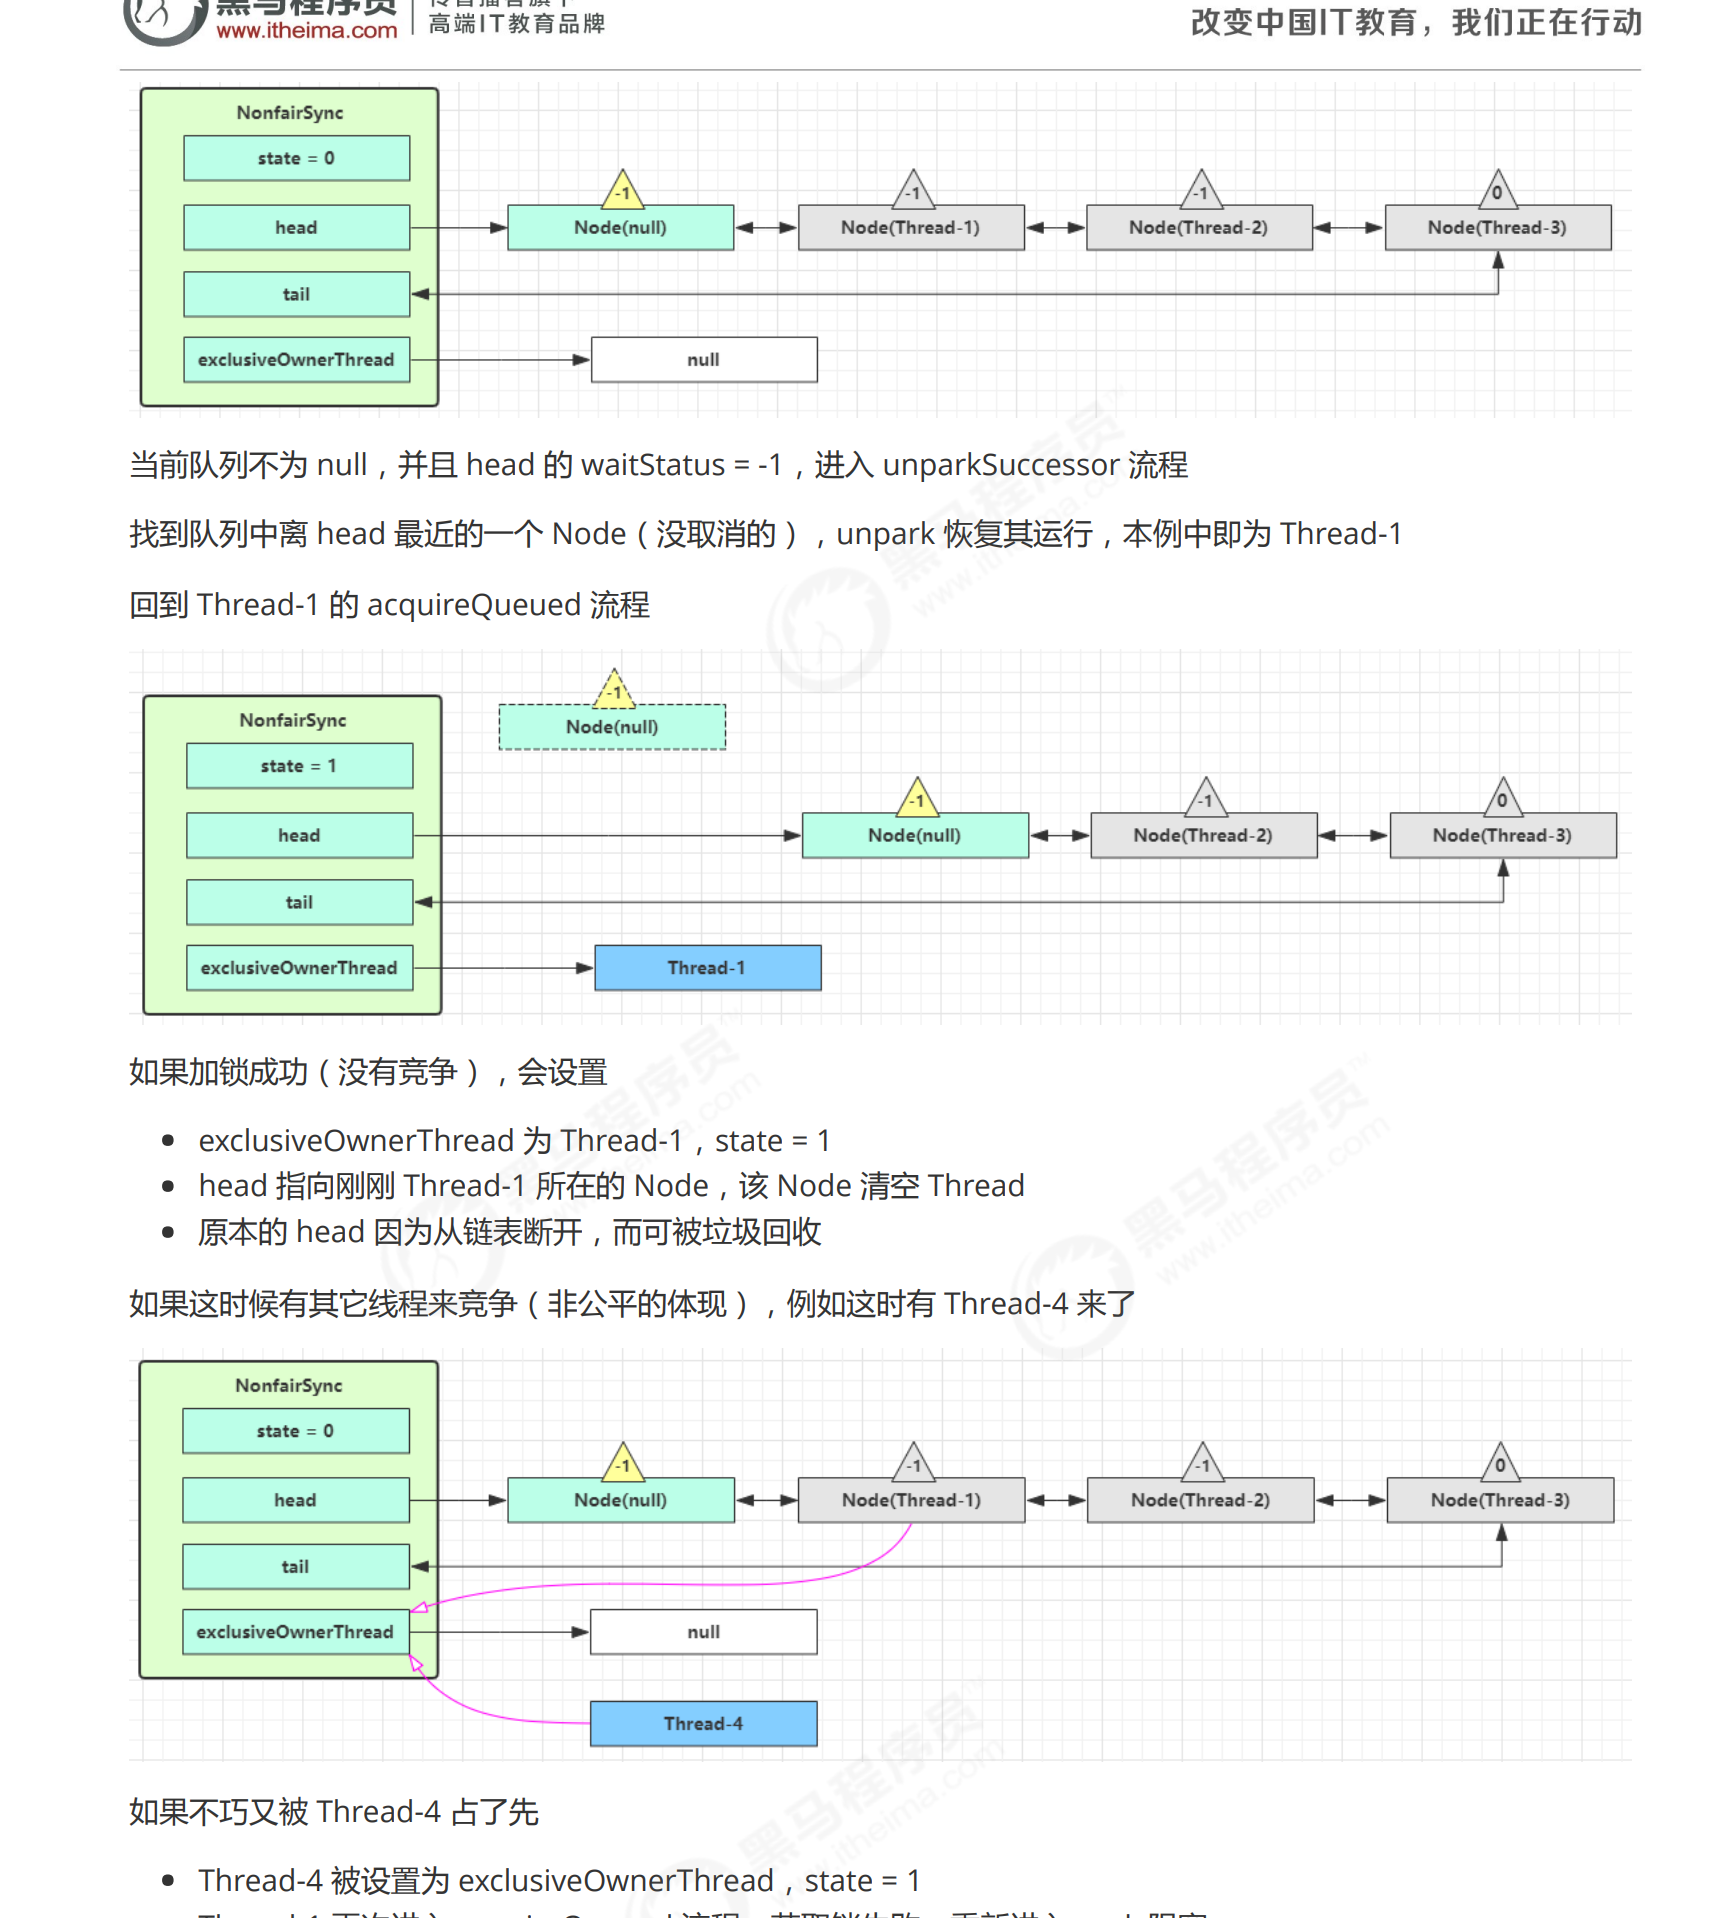
公平锁 在线程获取锁失败,进入阻塞队列时,先进入 的会在锁被释放后先获得 锁。这样的获取方式就是公平 的。
1 2 lock = new ReentrantLock(true );Copy
条件变量 synchronized 中也有条件变量,就是我们讲原理时那个 waitSet 休息室,当条件不满足时进入waitSet 等待
ReentrantLock 的条件变量比 synchronized 强大之处在于,它是支持多个 条件变量的,这就好比
synchronized 是那些不满足条件的线程都在一间休息室等消息
而 ReentrantLock 支持多间休息室,有专门等烟的休息室、专门等早餐的休息室、唤醒时也是按休息室来唤 醒
使用要点:
await 前需要获得锁
await 执行后,会释放锁,进入 conditionObject 等待
await 的线程被唤醒(或打断、或超时)取重新竞争 lock 锁
竞争 lock 锁成功后,从 await 后继续执
1 2 3 4 5 6 7 8 9 10 11 12 13 14 15 16 17 18 19 20 21 22 23 24 25 26 27 28 29 30 31 32 33 34 35 36 static Boolean judge = false ;public static void main (String[] args) throws InterruptedException {ReentrantLock lock = new ReentrantLock ();Condition condition = lock.newCondition();new Thread (()->{try {while (!judge) {"不满足条件,等待..." );catch (InterruptedException e) {finally {"执行完毕!" );new Thread (()->{try {1 );true ;catch (InterruptedException e) {finally {
通过Lock与AQS实现可重入锁 1 2 3 4 5 6 7 8 9 10 11 12 13 14 15 16 17 18 19 20 21 22 23 24 25 26 27 28 29 30 31 32 33 34 35 36 37 38 39 40 41 42 43 44 45 46 47 48 49 50 51 52 53 54 55 56 57 58 59 60 61 62 63 64 65 66 67 68 69 70 71 72 73 74 75 76 77 78 79 80 81 82 83 84 85 86 87 88 89 90 91 92 93 94 95 96 97 98 99 100 101 102 103 104 105 106 107 108 109 110 111 112 113 114 115 116 117 118 119 120 121 122 123 124 125 126 127 128 129 130 131 132 133 134 135 136 137 138 139 140 141 142 public class MyLock implements Lock {private static class Sync extends AbstractQueuedSynchronizer {@Override protected boolean tryAcquire (int arg) {if (getExclusiveOwnerThread() == null ) {if (compareAndSetState(0 , 1 )) {return true ;return false ;if (getExclusiveOwnerThread() == Thread.currentThread()) {int state = getState();1 );return true ;return false ;@Override protected boolean tryRelease (int arg) {if (getState() <= 0 ) {throw new IllegalMonitorStateException ();if (getExclusiveOwnerThread() != Thread.currentThread()) {throw new IllegalMonitorStateException ();int state = getState();if (state == 1 ) {null );0 );else {1 );return true ;@Override protected boolean isHeldExclusively () {return getState() >= 1 ;public Condition newCondition () {return new ConditionObject ();Sync sync = new Sync ();@Override public void lock () {1 );@Override public void lockInterruptibly () throws InterruptedException {1 );@Override public boolean tryLock () {return sync.tryAcquire(1 );@Override public boolean tryLock (long time, TimeUnit unit) throws InterruptedException {return sync.tryAcquireNanos(1 , time);@Override public void unlock () {1 );@Override public Condition newCondition () {return sync.newCondition();class Main {static int num = 0 ;public static void main (String[] args) throws InterruptedException, IOException {MyLock lock = new MyLock ();Object syncLock = new Object ();Thread t1 = new Thread (() -> {for (int i = 0 ; i < 10000 ; i++) {try {try {try {finally {finally {finally {Thread t2 = new Thread (() -> {for (int i = 0 ; i < 10000 ; i++) {try {try {try {finally {finally {finally {int x = 0 ;
AQS Node 状态:
1 2 3 4 5 6 7 8 9 10 11 12 13 14 15 16 17 18 19 20 21 22 23 24 25 26 27 28 29 30 31 32 33 34 35 36 37 38 39 40 41 42 43 44 45 46 47 48 49 50 51 52 53 54 static final class Node {static final Node SHARED = new Node (); static final Node EXCLUSIVE = null ; static final int CANCELLED = 1 ; static final int SIGNAL = -1 ; static final int CONDITION = -2 ; static final int PROPAGATE = -3 ; volatile int waitStatus; volatile Node prev; volatile Node next; volatile Thread thread; final boolean isShared () {return nextWaiter == SHARED;final Node predecessor () throws NullPointerException {Node p = prev;if (p == null )throw new NullPointerException ();else return p;this .nextWaiter = mode;this .thread = thread;int waitStatus) {this .waitStatus = waitStatus;this .thread = thread;
13、同步模式之顺序控制 Wait/Notify版本 1 2 3 4 5 6 7 8 9 10 11 12 13 14 15 16 17 18 19 20 21 22 23 24 25 26 static final Object LOCK = new Object ();static Boolean judge = false ;public static void main (String[] args) {new Thread (()->{synchronized (LOCK) {while (!judge) {try {catch (InterruptedException e) {"2" );new Thread (()->{synchronized (LOCK) {"1" );true ;
交替输出 wait/notify版本
1 2 3 4 5 6 7 8 9 10 11 12 13 14 15 16 17 18 19 20 21 22 23 24 25 26 27 28 29 30 31 32 33 34 35 36 37 38 39 40 41 42 43 44 45 46 47 48 49 50 51 52 53 54 55 56 57 58 public class Test4 {static Symbol symbol = new Symbol ();public static void main (String[] args) {new Thread (()->{"a" , 1 , 2 );new Thread (()->{"b" , 2 , 3 );"c" , 3 , 1 );new Thread (()->{class Symbol {public synchronized void run (String str, int flag, int nextFlag) {for (int i=0 ; i<loopNumber; i++) {while (flag != this .flag) {try {this .wait();catch (InterruptedException e) {this .flag = nextFlag;this .notifyAll();private int flag = 1 ;private int loopNumber = 5 ;public int getFlag () {return flag;public void setFlag (int flag) {this .flag = flag;public int getLoopNumber () {return loopNumber;public void setLoopNumber (int loopNumber) {this .loopNumber = loopNumber;
await/signal版本
1 2 3 4 5 6 7 8 9 10 11 12 13 14 15 16 17 18 19 20 21 22 23 24 25 26 27 28 29 30 31 32 33 34 35 36 37 38 39 40 41 42 43 44 45 46 47 48 49 50 51 52 53 54 55 56 57 58 59 60 61 public class Test5 {static AwaitSignal awaitSignal = new AwaitSignal ();static Condition conditionA = awaitSignal.newCondition();static Condition conditionB = awaitSignal.newCondition();static Condition conditionC = awaitSignal.newCondition();public static void main (String[] args) {new Thread (()->{"a" , conditionA, conditionB);new Thread (()->{"b" , conditionB, conditionC);new Thread (()->{"c" , conditionC, conditionA);try {1000 );catch (InterruptedException e) {try {finally {class AwaitSignal extends ReentrantLock {public void run (String str, Condition thisCondition, Condition nextCondition) {for (int i=0 ; i<loopNumber; i++) {try {catch (InterruptedException e) {finally {private int loopNumber=5 ;public int getLoopNumber () {return loopNumber;public void setLoopNumber (int loopNumber) {this .loopNumber = loopNumber;
14、ThreadLocal 简介 ThreadLocal是JDK包提供的,它提供了线程本地变量,也就是如果你创建了一个ThreadLocal变量,那么访问这个变量的每个线程都会有这个变量的一个本地副本 。当多个线程操作这个变量时,实际操作的是自己本地内存里面的变量,从而避免了线程安全问题
使用 1 2 3 4 5 6 7 8 9 10 11 12 13 14 15 16 17 18 19 20 21 22 23 24 25 26 27 28 29 30 31 32 33 34 35 36 37 38 39 40 41 42 43 44 45 46 47 48 49 50 51 52 53 54 55 56 57 58 59 60 public class ThreadLocalStudy {public static void main (String[] args )new ThreadLocal<>();new ThreadLocal<>();new Thread(()->{set ("thread1 stringThreadLocal first" );set ("thread1 stringThreadLocal second" );set (new User("Nyima" , 20 ));out .println(stringThreadLocal.get ());out .println(userThreadLocal.get ());remove ();out .println(userThreadLocal.get ());new Thread(()->{set ("thread2 stringThreadLocal first" );set ("thread2 stringThreadLocal second" );set (new User("Hulu" , 20 ));out .println(stringThreadLocal.get ());out .println(userThreadLocal.get ());class User {int age;public User (String name, int age )this .name = name;this .age = age;public String toString ()return "User{" +"name='" + name + '\'' +", age=" + age +'}' ;
运行结果
1 2 3 4 5 thread1 stringThreadLocal secondname ='Nyima' , age =20}name ='Hulu' , age =20}
从运行结果可以看出
每个线程中的ThreadLocal变量是每个线程私有的,而不是共享的
ThreadLocal其实就相当于其泛型类型的一个变量,只不过是每个线程私有的
stringThreadLocal被赋值了两次,保存的是最后一次赋值的结果
ThreadLocal可以进行以下几个操作
set 设置值
get 取出值
remove 移除值
原理 Thread中的threadLocals 1 2 3 4 5 6 7 8 9 10 11 12 13 14 15 16 17 18 19 20 public class Thread implements Runnable {ThreadLocalMap threadLocals = null ;ThreadLocalMap inheritableThreadLocals = null ;static class ThreadLocalMap {static class Entry extends WeakReference <ThreadLocal<?>> {super (k);
可以看出Thread类中有一个threadLocals和一个inheritableThreadLocals,它们都是ThreadLocalMap类型的变量,而ThreadLocalMap是一个定制化的Hashmap。在默认情况下,每个线程中的这两个变量都为null。此处先讨论threadLocals,inheritableThreadLocals放在后面讨论
ThreadLocal中的方法 set方法
1 2 3 4 5 6 7 8 9 10 11 12 13 14 15 public void set (T value) {Thread t = Thread.currentThread();ThreadLocalMap map = getMap(t);if (map != null )athis , value);else
如果未创建
1 2 3 4 5 void createMap (Thread t, T firstValue) {new ThreadLocalMap (this , firstValue);
get方法
1 2 3 4 5 6 7 8 9 10 11 12 13 14 15 16 17 18 19 20 21 22 23 24 25 26 27 28 29 30 31 32 33 34 35 public T get () {Thread t = Thread.currentThread();ThreadLocalMap map = getMap(t);if (map != null ) {Entry e = map.getEntry(this );if (e != null ) {@SuppressWarnings("unchecked") T result = (T)e.value;return result;return setInitialValue();private T setInitialValue () {T value = initialValue();Thread t = Thread.currentThread();ThreadLocalMap map = getMap(t);if (map != null )this , value);else return value;protected T initialValue () {return null ;
remove方法
1 2 3 4 5 6 public void remove () {ThreadLocalMap m = getMap(Thread.currentThread());if (m != null )this );
总结 在每个线程内部都有一个名为threadLocals的成员变量,该变量的类型为HashMap,其中key为我们定义的ThreadLocal变量的this引用,value则为我们使用set方法设置的值 。每个线程的本地变量存放在线程自己的内存变量threadLocals中
只有当前线程第一次调用ThreadLocal的set或者get方法时才会创建threadLocals (inheritableThreadLocals也是一样)。其实每个线程的本地变量不是存放在ThreadLocal实例里面,而是存放在调用线程的threadLocals变量里面
15、InheritableThreadLocal 简介 从ThreadLocal的源码可以看出,无论是set、get、还是remove,都是相对于当前线程操作的
1 Thread.currentThread()Copy
所以ThreadLocal无法从父线程传向子线程,所以InheritableThreadLocal出现了,它能够让父线程中ThreadLocal的值传给子线程。
也就是从main所在的线程,传给thread1或thread2
使用 1 2 3 4 5 6 7 8 9 10 11 12 13 14 15 16 17 18 19 20 21 public class Demo1 {public static void main (String[] args) {new ThreadLocal <>();new InheritableThreadLocal <>();"this is threadLocal" );"this is inheritableThreadLocal" );Thread thread1 = new Thread (()->{
运行结果
1 2 null this is inheritableThreadLocalCopy
可以看出InheritableThreadLocal的值成功从主线程传入了子线程,而ThreadLocal则没有
原理 InheritableThreadLocal 1 2 3 4 5 6 7 8 9 10 11 12 13 14 15 16 17 18 public class InheritableThreadLocal <T> extends ThreadLocal <T> {protected T childValue (T parentValue) {return parentValue;getMap (Thread t) {return t.inheritableThreadLocals;void createMap (Thread t, T firstValue) {new ThreadLocalMap (this , firstValue);
由如上代码可知,InheritableThreadLocal继承了ThreadLocal,并重写了三个方法。InheritableThreadLocal重写了createMap方法 ,那么现在当第一次调用set方法时,创建的是当前线程的inheritableThreadLocals变量的实例而不再是threadLocals。当调用getMap方法 获取当前线程内部的map变量时,获取的是inheritableThreadLocals而不再是threadLocals
childValue(T parentValue)方法的调用 在主函数运行时,会调用Thread的默认构造函数(创建主线程 ,也就是父线程),所以我们先看看Thread的默认构造函数
1 2 3 4 5 6 7 8 9 10 11 12 13 14 15 16 17 18 19 20 21 22 23 24 25 26 27 28 29 public Thread () {null , null , "Thread-" + nextThreadNum(), 0 );private void init (ThreadGroup g, Runnable target, String name, long stackSize, AccessControlContext acc, boolean inheritThreadLocals) {Thread parent = currentThread();if (inheritThreadLocals && parent.inheritableThreadLocals != null )this .inheritableThreadLocals =this .stackSize = stackSize;static ThreadLocalMap createInheritedMap (ThreadLocalMap parentMap) {return new ThreadLocalMap (parentMap);
在createInheritedMap内部使用父线程的inheritableThreadLocals变量作为构造函数创建了一个新的ThreadLocalMap变量,然后赋值给了子线程的inheritableThreadLocals变量
1 2 3 4 5 6 7 8 9 10 11 12 13 14 15 16 17 18 19 20 21 22 23 24 25 26 private ThreadLocalMap (ThreadLocalMap parentMap) {int len = parentTable.length;new Entry [len];for (int j = 0 ; j < len; j++) {Entry e = parentTable[j];if (e != null ) {@SuppressWarnings("unchecked") if (key != null ) {Object value = key.childValue(e.value);Entry c = new Entry (key, value);int h = key.threadLocalHashCode & (len - 1 );while (table[h] != null )
在该构造函数内部把父线程的inheritableThreadLocals成员变量的值复制到新的ThreadLocalMap对象中
总结 InheritableThreadLocal类通过重写getMap和createMap,让本地变量保存到了具体线程的inheritableThreadLocals变量里面,那么线程在通过InheritableThreadLocal类实例的set或者get方法设置变量时,就会创建当前线程的inheritableThreadLocals变量。
当父线程创建子线程时,构造函数会把父线程中inheritableThreadLocals变量里面的本地变量复制一份保存到子线程的inheritableThreadLocals变量里面。
四、共享模型之内存 1、JAVA内存模型(JMM) JMM 即 Java Memory Model,它定义了主存(共享内存)、工作内存(线程私有) 抽象概念,底层对应着 CPU 寄存器、缓存、硬件内存、 CPU 指令优化等。
JMM体现在以下几个方面
原子性 - 保证指令不会受到线程上下文切换的影响
可见性 - 保证指令不会受 cpu 缓存的影响
有序性 - 保证指令不会受 cpu 指令并行优化的影响
2、可见性 引例 退出不出的循环
1 2 3 4 5 6 7 8 9 10 11 12 static Boolean run = true ;public static void main (String[] args) throws InterruptedException {new Thread (()->{while (run) {1000 );"改变run的值为false" );false ;
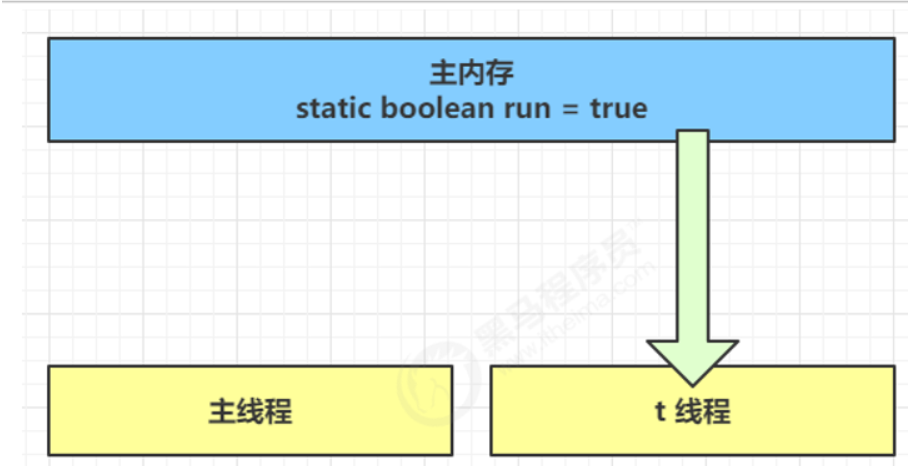
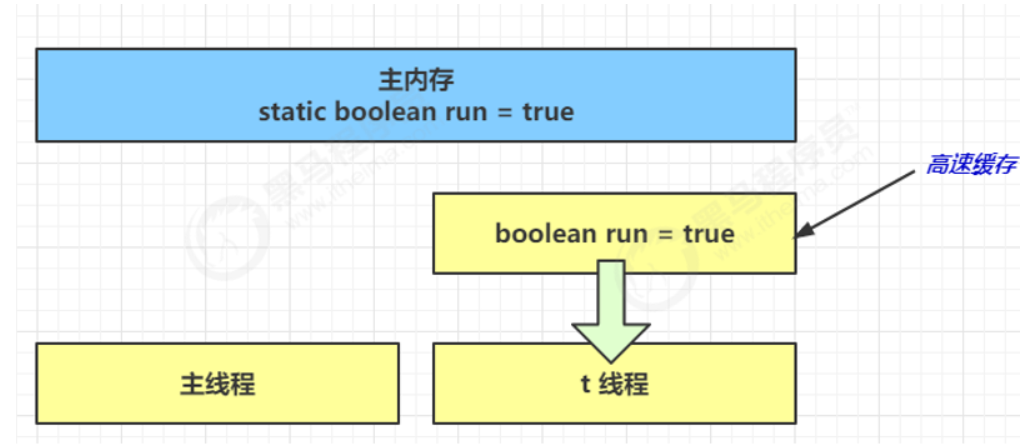
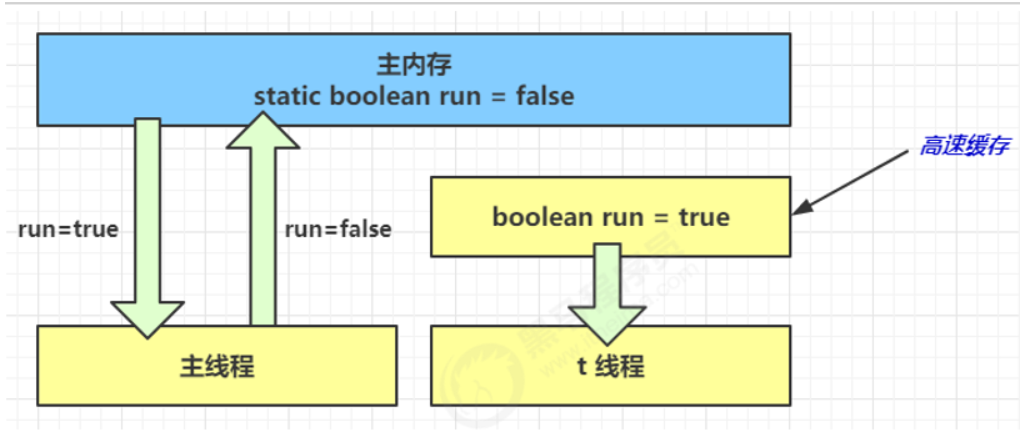
为什么无法退出该循环
初始状态, t 线程刚开始从主内存 读取了 run 的值到工作内存 。
因为 t 线程要频繁从主内存中读取 run 的值,JIT 编译器会将 run 的值缓存至自己工作内存 中的高速缓存中, 减少对主存中 run 的访问,提高效率
1 秒之后,main 线程修改了 run 的值,并同步至主存,而 t 是从自己工作内存中的高速缓存中读取这个变量 的值,结果永远是旧值
解决方法
使用volatile 易变关键字
它可以用来修饰成员变量 和静态成员变量 (放在主存中的变量),他可以避免线程从自己的工作缓存中查找变量的值,必须到主存中获取它的值,线程操作 volatile 变量都是直接操作主存
1 2 3 4 5 6 7 8 9 10 11 12 13 volatile static Boolean run = true ;public static void main (String [] args) throws InterruptedException new Thread (()->{while (run) {start ();sleep (1000 );println ("改变run的值为false" );false ;
可见性与原子性 前面例子体现的实际就是可见性 ,它保证的是在多个线程之间,一个线程对volatile变量 的修改对另一个线程可见, 不能 保证原子性,仅用在一个写 线程,多个读 线程的情况
注意 synchronized 语句块既可以保证代码块的原子性 ,也同时保证代码块内变量的可见性 。
但缺点是 synchronized 是属于重量级 操作,性能相对更低。
如果在前面示例的死循环中加入 System.out.println() 会发现即使不加 volatile 修饰符,线程 t 也能正确看到 对 run 变量的修改了,想一想为什么?
1 2 3 4 5 6 7 public void println (String x) {synchronized (this ) {
两阶终止模式优化 1 2 3 4 5 6 7 8 9 10 11 12 13 14 15 16 17 18 19 20 21 22 23 24 25 26 27 28 29 30 31 32 33 34 35 36 37 38 39 40 41 42 43 44 45 46 47 48 49 50 51 public class Test7 {public static void main (String[] args) throws InterruptedException {Monitor monitor = new Monitor ();3500 );class Monitor {private volatile boolean stop = false ;public void start () {new Thread () {@Override public void run () {while (true ) {if (stop) {"处理后续任务" );break ;"监控器运行中..." );try {1000 );catch (InterruptedException e) {"被打断了" );public void stop () {true ;
同步模式之犹豫模式 定义
Balking (犹豫)模式用在一个线程发现另一个线程或本线程已经做了某一件相同 的事,那么本线程就无需再做 了,直接结束返回
用一个标记来判断该任务是否已经被执行过了
需要避免线程安全问题
1 2 3 4 5 6 7 8 9 10 11 12 13 14 15 16 17 18 19 20 21 22 23 24 25 26 27 28 29 30 31 32 33 34 35 36 37 38 39 40 41 42 43 44 45 46 47 48 49 50 51 52 53 54 55 56 57 58 59 60 61 62 63 64 65 66 67 68 package com.nyima.day1;public class Test7 {public static void main (String[] args) throws InterruptedException {Monitor monitor = new Monitor ();3500 );class Monitor {private volatile boolean stop = false ;private boolean starting = false ;public void start () {synchronized (this ) {if (starting) {return ;true ;new Thread () {@Override public void run () {while (true ) {if (stop) {"处理后续任务" );break ;"监控器运行中..." );try {1000 );catch (InterruptedException e) {"被打断了" );public void stop () {true ;
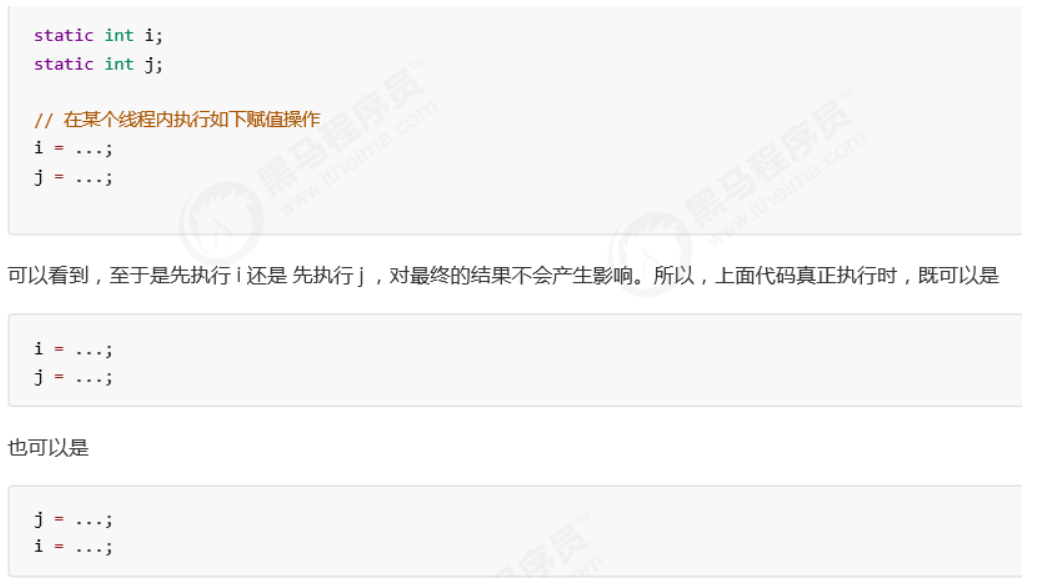
3、有序性 指令重排
JVM 会在不影响正确性 的前提下,可以调整 语句的执行顺序
这种特性称之为『指令重排 』,多线程下『指令重排』会影响正确性 。
指令重排序优化
事实上,现代处理器会设计为一个时钟周期完成一条执行时间长的 CPU 指令。为什么这么做呢?可以想到指令还可以再划分成一个个更小的阶段,例如,每条指令都可以分为: 取指令 - 指令译码 - 执行指令 - 内存访问 - 数据写回 这5 个阶段
支持流水线的处理器 现代 CPU 支持多级指令流水线 ,例如支持同时 执行 取指令 - 指令译码 - 执行指令 - 内存访问 - 数据写回 的处理器,就可以称之为五级指令流水线。这时 CPU 可以在一个时钟周期内,同时运行五条指令的不同阶段(相当于一 条执行时间长的复杂指令),IPC = 1,本质上,流水线技术并不能缩短单条指令的执行时间,但它变相地提高了指令地吞吐率 。
在多线程环境下,指令重排序可能导致出现意料之外的结果
解决办法 volatile 修饰的变量,可以禁用 指令重排
禁止的是加volatile关键字变量之前的代码被重排序
4、内存屏障
可见性
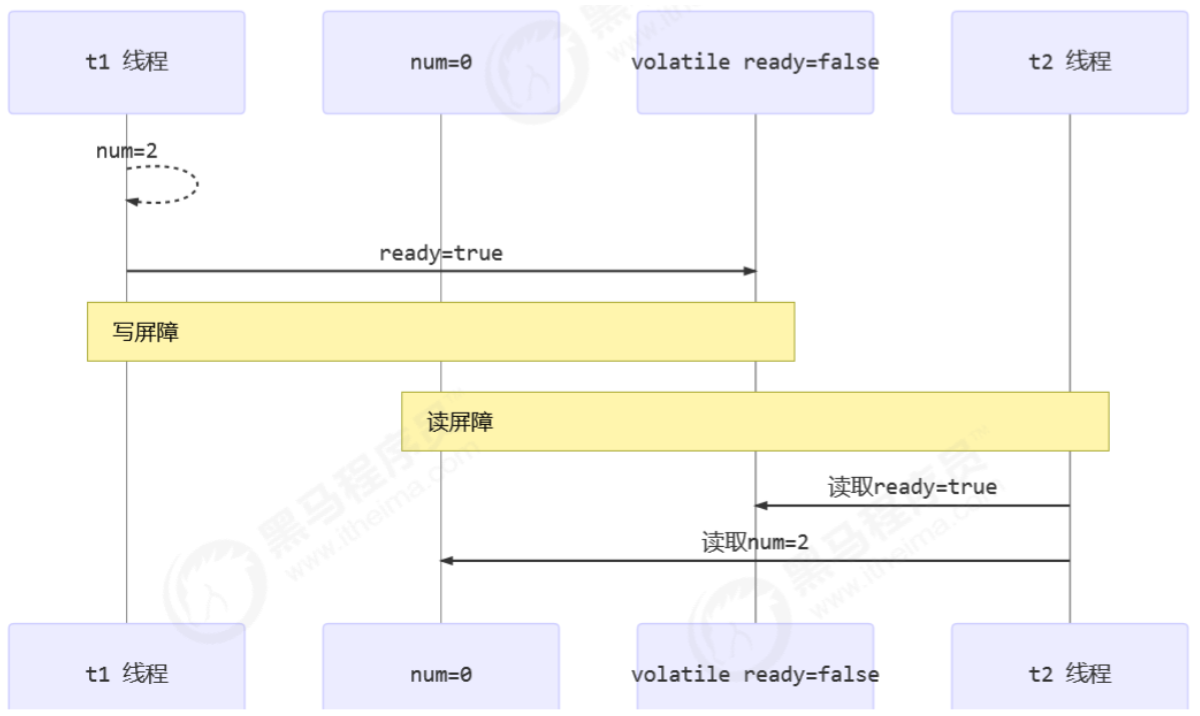
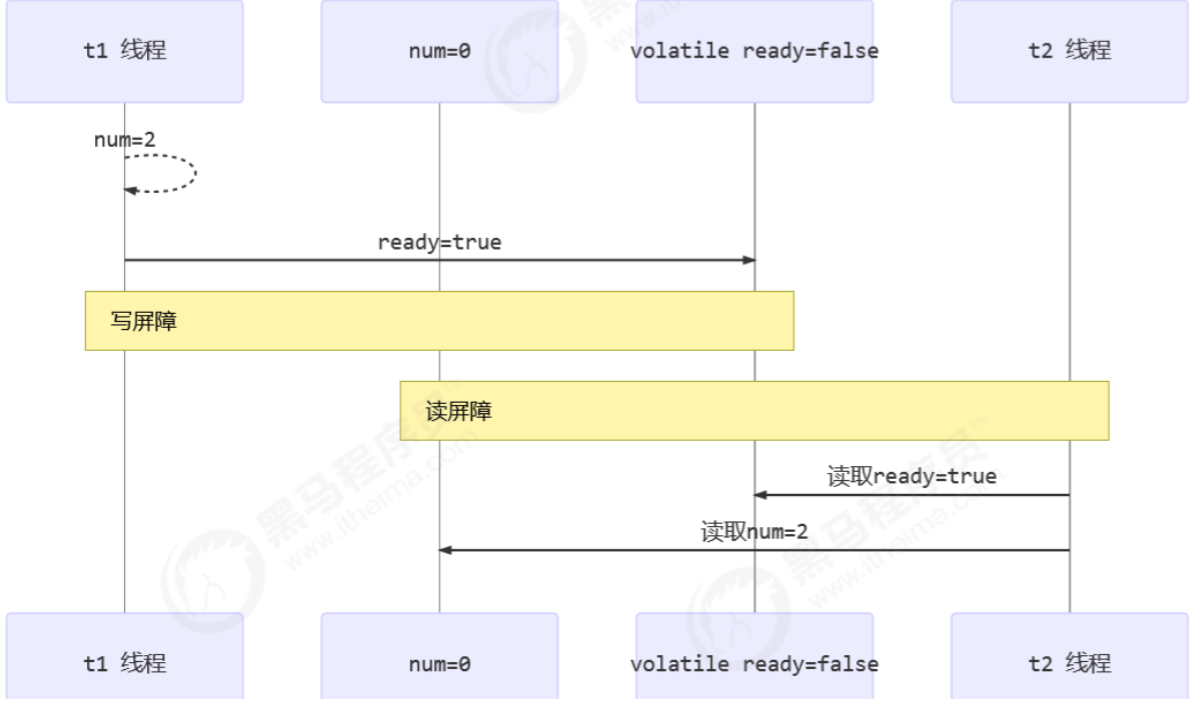
写屏障 (sfence)保证在该屏障之前 的,对共享变量的改动,都同步到主存当中读屏障 (lfence)保证在该屏障之后 ,对共享变量的读取,加载的是主存中新数据
有序性
写屏障会确保指令重排序时,不会将写屏障之前 的代码排在写屏障之后
读屏障会确保指令重排序时,不会将读屏障之后 的代码排在读屏障之前
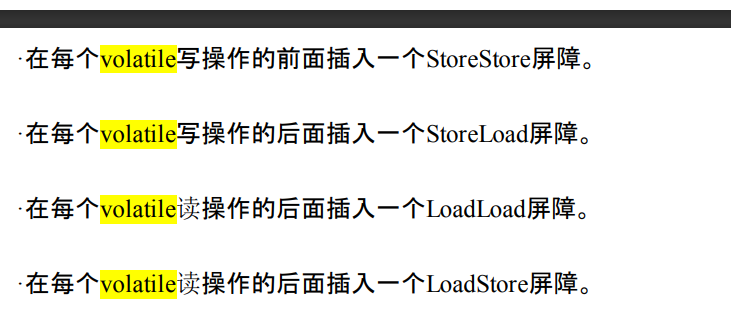
5、volatile 原理 volatile的底层实现原理是内存屏障 ,Memory Barrier(Memory Fence)
对 volatile 变量的写指令后会加入写屏障
对 volatile 变量的读指令前会加入读屏障
如何保证可见性
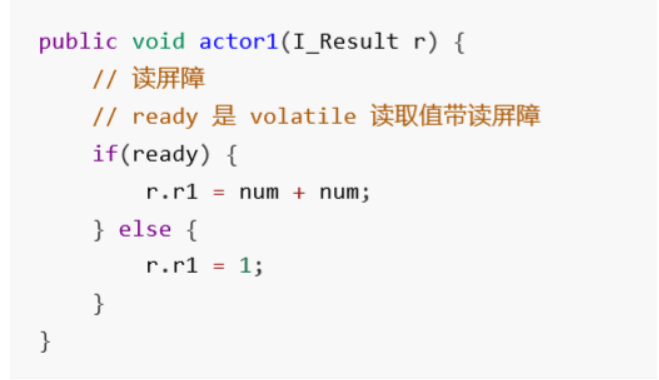
如何保证有序性
但是不能解决指令交错问题
写屏障仅仅是保证之后的读能够读到新的结果,但不能保证读跑到它前面去
而有序性的保证也只是保证了本线程内 相关代码不被重排序
实现原理之Lock前缀 在X86处理器下通过工具获取JIT编译器生成的汇编指令来查看对volatile进行写操作时
1 instance = new Singleton()
对应的汇编代码是
有volatile变量修饰的共享变量进行写操作的时候会多出第二行汇编代码,通过查IA-32架构软件开发者手册可知,Lock前缀 的指令在多核处理器下会引发了两件事
Lock前缀指令会引起处理器
缓存回写到内存
Lock前缀指令导致在执行指令期间,声言处理器的LOCK#信号。在多处理器环境中,LOCK#信号确保在声言该信号期间,处理器可以独占任何共享内存。但是,在最近的处理器里,LOCK #信号一般不锁总线,而是锁缓存 ,毕竟锁总线开销的比较大。使用缓存一致性机制来确保修改的原子性,此操作被称为“缓存锁定”,缓存一致性机制会阻止同时修改由两个以上处理器缓存的内存区域数据
一个处理器的缓存回写到内存会
导致其他处理器的缓存无效
在多核处理器系统中进行操作的时候,IA-32和Intel 64处理器能嗅探其他处理器访问系统内存和它们的内部缓存 。处理器使用嗅探技术保证它的内部缓存、系统内存和其他处理器的缓存的数据在总线上保持一致
五、共享模型之无锁 1、无锁解决线程安全问题
使用原子整数
1 AtomicInteger balance = new AtomicInteger()
1 2 3 4 5 6 7 8 9 10 11 12 13 14 15 16 17 18 19 20 21 22 23 24 25 26 27 28 29 30 31 32 33 34 35 36 37 38 39 40 41 42 43 44 45 46 47 48 49 50 51 52 53 54 55 56 57 58 59 60 61 62 63 64 65 66 67 68 69 70 71 72 73 74 75 76 77 78 79 80 81 82 83 interface Account {getBalance () ;void withdraw (Integer amount) ;static void demo (Account account) {new ArrayList <>();long start = System.nanoTime();for (int i = 0 ; i < 1000 ; i++) {new Thread (() -> {10 );try {catch (InterruptedException e) {long end = System.nanoTime();" cost: " + (end - start) / 1000_000 + " ms" );class AccountUnsafe implements Account {private Integer balance;public AccountUnsafe (Integer balance) {this .balance = balance;@Override public Integer getBalance () {return this .balance;@Override public synchronized void withdraw (Integer amount) {public static void main (String[] args) {new AccountUnsafe (10000 ));new AccountCas (10000 ));class AccountCas implements Account {private AtomicInteger balance;public AccountCas (int balance) {this .balance = new AtomicInteger (balance);@Override public Integer getBalance () {return balance.get();@Override public void withdraw (Integer amount) {while (true ) {int prev = balance.get();int next = prev-amount;if (balance.compareAndSet(prev, next)) {break ;
2、CAS与volatile 前面看到的 AtomicInteger 的解决方法,内部并没有用锁来保护共享变量的线程安全。那么它是如何实现的呢?
其中的关键是 compareAndSwap (比较并设置值),它的简称就是 CAS (也有 Compare And Swap 的说法),它必须是原子操作 。
工作流程
当一个线程要去修改Account对象中的值时,先获取值pre(调用get方法),然后再将其设置为新的值next(调用cas方法)。在调用cas方法时,会将pre与Account中的余额进行比较。
如果两者相等 ,就说明该值还未被其他线程修改,此时便可以进行修改操作。
如果两者不相等 ,就不设置值,重新获取值pre(调用get方法),然后再将其设置为新的值next(调用cas方法),直到修改成功为止。
注意
其实 CAS 的底层是 lock cmpxchg 指令(X86 架构),在单核 CPU 和多核 CPU 下都能够保证【比较-交换】的原子性 。
在多核状态下,某个核执行到带 lock 的指令时,CPU 会让总线锁住,当这个核把此指令执行完毕,再开启总线。这个过程中不会被线程的调度机制所打断,保证了多个线程对内存操作的准确性,是原子的。
volatile 获取共享变量时,为了保证该变量的可见性 ,需要使用 volatile 修饰。主存中获取 它的值,线程操作 volatile 变量都是直接操作主存。即一个线程对 volatile 变量的修改,对另一个线程可见。
注意
1 volatile 仅仅保证了共享变量的可见性,让其它线程能够看到新值,但不能解决指令交错问题(不能保证原子性)Copy
CAS 必须借助 volatile 才能读取到共享变量的新值来实现【比较并交换】的效果
效率问题 一般情况下,使用无锁比使用加锁的效率更高。
原因
CAS特点 结合 CAS 和 volatile 可以实现无锁并发 ,适用于线程数少、多核 CPU 的场景下。
3、原子整数 J.U.C 并发包提供了
AtomicBoolean
AtomicInteger
AtomicLong
以 AtomicInteger 为例
1 2 3 4 5 6 7 8 9 10 11 12 13 14 15 16 17 18 19 20 21 22 23 24 25 26 27 28 29 30 31 32 33 AtomicInteger i = new AtomicInteger(0) ;System .AndDecrement() );System .AndAdd(5) );System .AndGet(-5) );System .AndUpdate(p -> p - 2) );System .AndGet(p -> p + 2) );System .AndAccumulate(10, (p , x ) -> p + x));System .AndGet(-10, (p , x ) -> p + x));Copy
4、原子引用 1 2 3 4 5 6 7 8 9 10 11 12 13 14 15 16 17 18 19 20 21 22 23 24 25 26 27 28 29 30 31 32 33 34 35 36 37 38 39 40 41 42 43 44 45 46 47 48 49 50 51 52 53 54 55 56 57 58 public interface DecimalAccount {void withdraw(BigDecimal amount);static void demo(DecimalAccountImpl account) {new ArrayList<>();for (int i = 0 ; i < 1000 ; i++) {(new Thread(() -> { account.withdraw(BigDecimal.TEN); })) ; } ts .forEach (Thread::start) ; ts .forEach (t -> { try { t.join(); } catch (InterruptedException e) { e.printStackTrace(); } }) ; long end = System .nanoTime () ; System .out .println (account.getBalance() + " cost: " + (end - start) / 1000_000 + " ms" ) ; } } class DecimalAccountImpl implements DecimalAccount { //原子引用,泛型类型为小数类型 AtomicReference <BigDecimal > balance ; public DecimalAccountImpl (BigDecimal balance) { this .balance = new AtomicReference <BigDecimal >(balance) ; } @Override public BigDecimal getBalance () { return balance .get () ; } @Override public void withdraw (BigDecimal amount) { while (true ) { BigDecimal pre = balance .get () ; BigDecimal next = pre .subtract (amount) ; if (balance.compareAndSet(pre, next)) { break ; } } } public static void main (String [] args) { DecimalAccount .demo (new DecimalAccountImpl(new BigDecimal("10000" ))) ; } }Copy
5、ABA问题 1 2 3 4 5 6 7 8 9 10 11 12 13 14 15 16 17 18 19 20 21 22 23 24 25 26 27 28 29 30 31 public class Demo3 {static AtomicReference<String> str = new AtomicReference<>("A" );public static void main (String[] args )new Thread(() -> {get ();out .println("change" );try {catch (InterruptedException e) {try {1000 );catch (InterruptedException e) {out .println("change A->C " + str.compareAndSet(pre, "C" ));static void other () throws InterruptedExceptionnew Thread(()-> {out .println("change A->B " + str.compareAndSet("A" , "B" ));500 );new Thread(()-> {out .println("change B->A " + str.compareAndSet("B" , "A" ));
主线程仅能判断出共享变量的值与初值 A 是否相同 ,不能感知到这种从 A 改为 B 又 改回 A 的情况,如果主线程希望:动过了 】共享变量,那么自己的 cas 就算失败 ,这时,仅比较值是不够的,需要再加一个版本号
AtomicStampedReference 1 2 3 4 5 6 7 8 9 10 11 12 13 14 15 16 17 18 19 20 21 22 23 24 25 26 27 28 29 30 31 32 33 34 35 36 public class Demo3 {new AtomicStampedReference<>("A" , 0 );[] args) {new Thread(() -> {Reference() ;int stamp = str.getStamp() ;System ."change" );try {() ;StackTrace() ;try {Thread .1000 );StackTrace() ;System ."change A->C stamp " + stamp + str.compareAndSet(pre , "C" , stamp , stamp +1) );() ;() throws InterruptedException {new Thread(() -> {int stamp = str.getStamp() ;System ."change A->B stamp " + stamp + str.compareAndSet("A" , "B" , stamp , stamp +1) );() ;Thread .500 );new Thread(() -> {int stamp = str.getStamp() ;System ."change B->A stamp " + stamp + str.compareAndSet("B" , "A" , stamp , stamp +1) );() ;
AtomicMarkableReference AtomicStampedReference 可以给原子引用加上版本号,追踪原子引用整个的变化过程,如: A -> B -> A -> C ,通过AtomicStampedReference,我们可以知道,引用变量中途被更改了几次。是否更改过 ,所以就有了 AtomicMarkableReference
1 2 3 4 5 6 7 8 9 10 11 12 13 14 15 16 17 18 19 20 21 22 23 24 25 26 27 28 public class Demo4 {static AtomicMarkableReference<String> str = new AtomicMarkableReference<>("A" , true );public static void main (String[] args )new Thread(() -> {out .println("change" );try {catch (InterruptedException e) {try {1000 );catch (InterruptedException e) {out .println("change A->C mark " + str.compareAndSet(pre, "C" , true , false ));static void other () throws InterruptedExceptionnew Thread(() -> {out .println("change A->A mark " + str.compareAndSet("A" , "A" , true , false ));
两者的区别
AtomicStampedReference 需要我们传入整型变量 作为版本号,来判定是否被更改过AtomicMarkableReference 需要我们传入布尔变量 作为标记,来判断是否被更改过
6、原子数组
AtomicIntegerArray
AtomicLongArray
AtomicReferenceArray
lamba表达式的使用
7、原子更新器
AtomicReferenceFieldUpdater // 域 字段
AtomicIntegerFieldUpdater
AtomicLongFieldUpdate
原子更新器用于帮助我们改变某个对象中的某个属性
1 2 3 4 5 6 7 8 9 10 11 12 13 14 15 16 17 18 19 20 21 22 23 24 25 26 public class Demo1 {public static void main (String [] argsStudent student = new Student ();AtomicReferenceFieldUpdater <Student , String > updater = AtomicReferenceFieldUpdater .newUpdater (Student .class , String .class , "name" );compareAndSet (student, null , "Nyima" );System .out .println (student);class Student {String name;@Override public String toString (return "Student{" +"name='" + name + '\'' +'}' ;Copy
原子更新器初始化过程 从上面的例子可以看出,原子更新器是通过newUpdater来获取实例的。其中传入了三个参数
拥有属性的类的Class
属性的Class
属性的名称
大概可以猜出来,初始化过程用到了反射 ,让我们看看源码来验证一下这个猜测。
newUpdater方法 1 2 3 4 5 6 7 public static <U,W> AtomicReferenceFieldUpdater<U,W> new Updater (Class<U> tclass,String fieldName) {return new AtomicReferenceFieldUpdaterImpl <U,W>
从newUpdater方法还并不能看出来具体的初始化过程
内部实现类
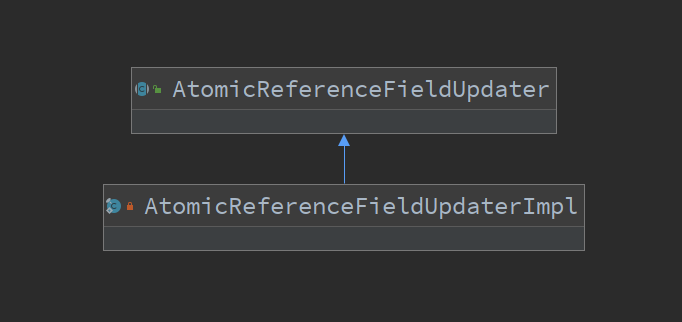
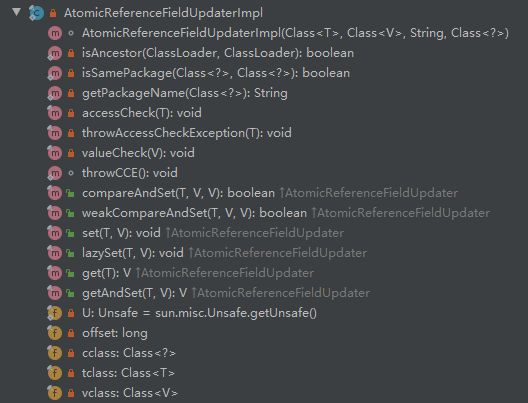
AtomicReferenceFieldUpdater为抽象类,该类内部有一个自己的实现类AtomicReferenceFieldUpdaterImpl
1 2 private static final class AtomicReferenceFieldUpdaterImpl <T,V >extends AtomicReferenceFieldUpdater <T,V >Copy
构造方法
1 2 3 4 5 6 7 8 9 10 11 12 13 14 15 16 17 18 19 20 21 22 23 24 25 26 27 28 29 30 31 32 33 34 35 36 37 38 39 40 41 42 43 44 45 46 47 48 49 50 51 52 53 54 55 56 57 58 59 60 61 62 63 64 65 66 67 68 69 AtomicReferenceFieldUpdaterImpl(final Class <T> tclass,final Class <V> vclass,final String fieldName,final Class <?> caller) {final Field field;final Class <?> fieldClass;final int modifiers;try {new PrivilegedExceptionAction<Field>() {public Field run() throws NoSuchFieldException {return tclass.getDeclaredField(fieldName);null , modifiers);if ((ccl != null ) && (ccl != cl) &&null ) || !isAncestor(cl, ccl))) {catch (PrivilegedActionException pae) {throw new RuntimeException(pae.getException());catch (Exception ex) {throw new RuntimeException(ex);if (vclass != fieldClass)throw new ClassCastException();if (vclass.isPrimitive())throw new IllegalArgumentException("Must be reference type" );if (!Modifier.isVolatile(modifiers))throw new IllegalArgumentException("Must be volatile type" );this .cclass = (Modifier.isProtected(modifiers) &&this .tclass = tclass;this .vclass = vclass;this .offset = U.objectFieldOffset(field);Copy
可以看出,原子引用更新器确实使用了反射
8、LongAdder原理 原理之伪共享
缓存行伪共享得从缓存说起
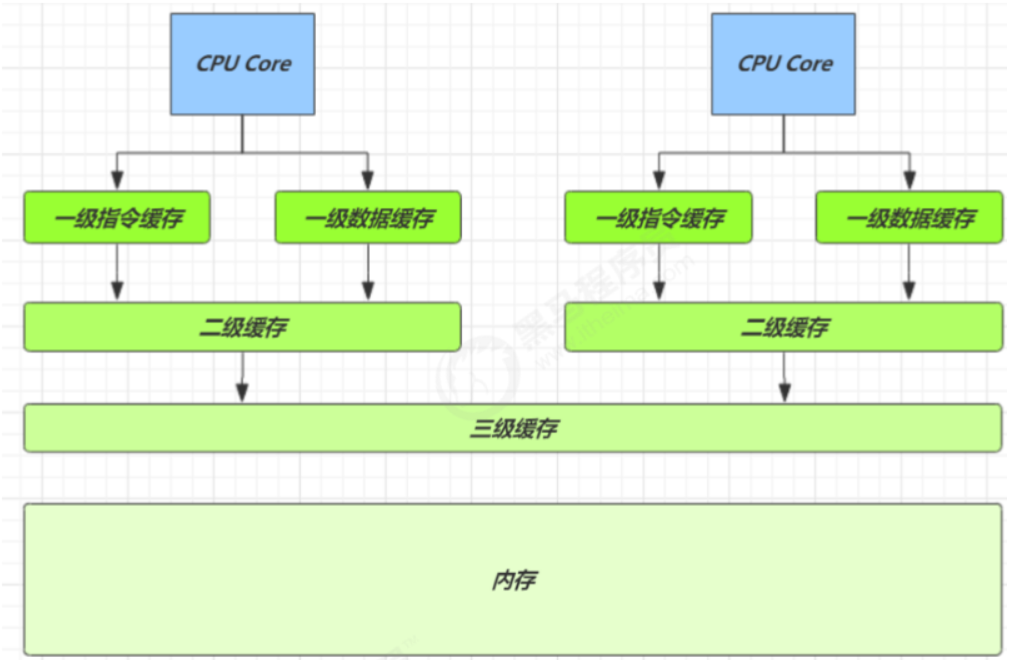
因为 CPU 与 内存的速度差异很大,需要靠预读数据至缓存 来提升效率。缓存行 为单位,每个缓存行对应着一块内存,一般是 64 byte (8 个 long)一致性 ,如果某个 CPU 核心更改 了数据,其它 CPU 核心对应的整个缓存行必须失效
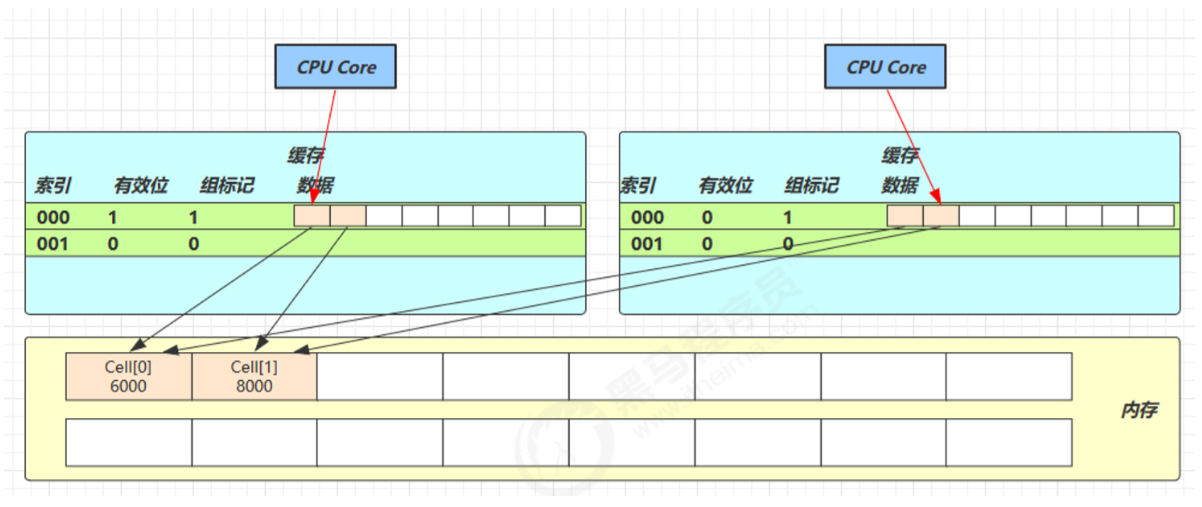
因为 Cell 是数组形式,在内存中是连续存储的,一个 Cell 为 24 字节(16 字节的对象头和 8 字节的 value),因 此缓存行可以存下 2 个的 Cell 对象。这样问题来了:
Core-0 要修改 Cell[0]
Core-1 要修改 Cell[1]
无论谁修改成功,都会导致对方 Core 的缓存行失效,
比如 Core-0 中 Cell[0]=6000, Cell[1]=8000 要累加 Cell[0]=6001, Cell[1]=8000 ,这时会让 Core-1 的缓存行失效
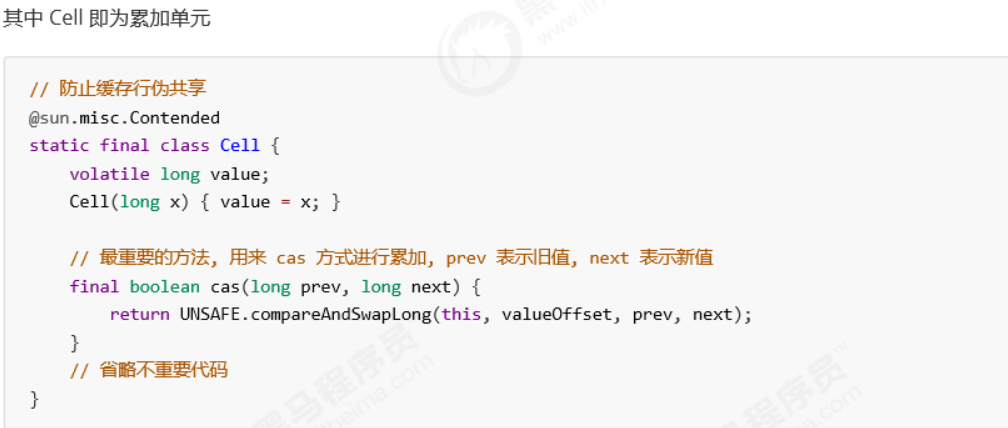
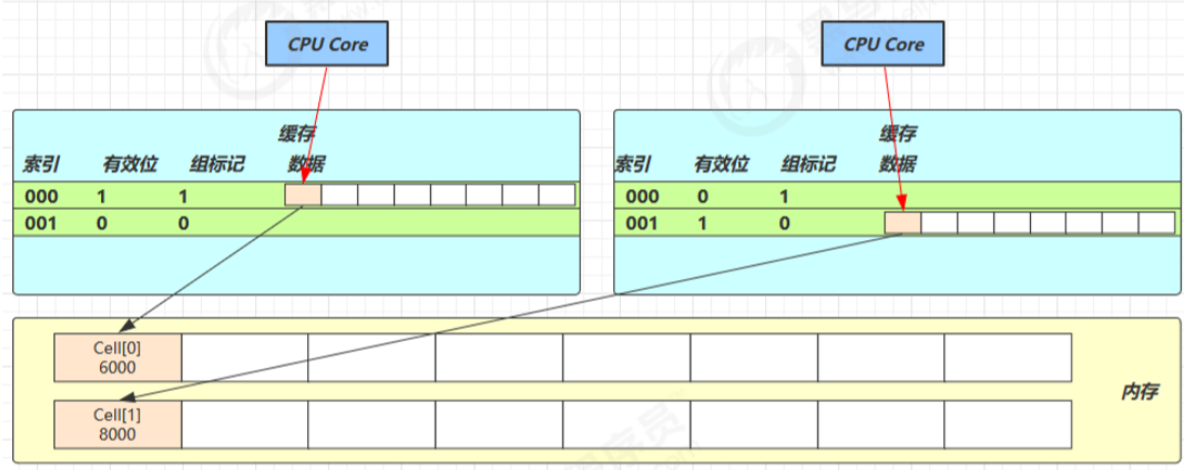
@sun.misc.Contended 用来解决这个问题,它的原理是在使用此注解的对象或字段的前后各增加 128 字节大小的 padding (空白),从而让 CPU 将对象预读至缓存时占用不同的缓存行 ,这样,不会造成对方缓存行的失效
累加主要调用以下方法
1 2 3 4 5 6 7 8 9 10 public void add (long xas ; long b, v; int m; Cell a;if ((as = cells) != null || !casBase(b = base , b + x)) {true ;if (as == null || (m = as .length - 1 ) < 0 ||as [getProbe() & m]) == null ||value , v + x)))null , uncontended);
累加流程图
9、Unsafe Unsafe 对象提供了非常底层的,操作内存、线程的方法,Unsafe 对象不能直接调用,只能通过反射 获得
1 2 3 4 5 6 7 8 9 10 11 12 13 14 15 16 17 18 19 20 21 22 23 24 25 26 27 28 29 30 31 32 33 34 35 public class GetUnsafe {public static void main (String[] args) throws NoSuchMethodException, IllegalAccessException, InvocationTargetException, InstantiationException, NoSuchFieldException {Class unsafeClass = Unsafe.class;Constructor constructor = unsafeClass.getDeclaredConstructor();true );Unsafe unsafe = (Unsafe) constructor.newInstance();Person person = new Person ();Field field = Person.class.getDeclaredField("name" );long offset = unsafe.objectFieldOffset(field);null , "Nyima" );class Person {volatile String name;@Override public String toString () {return "Person{" +"name='" + name + '\'' +'}' ;
六、共享模型之不可变 1、不可变 如果一个对象在不能够修 改其内部状态(属性),那么它就是线程安全的,因为不存在并发修改。
2、不可变设计 String类中不可变的体现 1 2 3 4 5 6 7 8 9 10 11 public final class String implements java .io.Serializable, Comparable<String>, CharSequence {private final char value[];private int hash;
final 的使用 ** 的
属性用 final 修饰保证了该属性是只读的,不能修改
类用 final 修饰保证了该类中的方法不能被覆盖,防止子类无意间破坏不可变性
**保护性拷贝 **
但有同学会说,使用字符串时,也有一些跟修改相关的方法啊,比如 substring 等,那么下面就看一看这些方法是 如何实现的,就以 substring 为例
1 2 3 4 5 6 7 8 9 10 11 public String substring (int beginIndex) {if (beginIndex < 0 ) {throw new StringIndexOutOfBoundsException (beginIndex);int subLen = value.length - beginIndex;if (subLen < 0 ) {throw new StringIndexOutOfBoundsException (subLen);return (beginIndex == 0 ) ? this : new String (value, beginIndex, subLen);
发现其内部是调用 String 的构造方法创建了一个新字符串
1 2 3 4 5 6 7 8 9 10 11 12 13 14 15 16 17 18 19 public String (char value[], int offset, int count) {if (offset < 0 ) {throw new StringIndexOutOfBoundsException (offset);if (count <= 0 ) {if (count < 0 ) {throw new StringIndexOutOfBoundsException (count);if (offset <= value.length) {this .value = "" .value;return ;if (offset > value.length - count) {throw new StringIndexOutOfBoundsException (offset + count);this .value = Arrays.copyOfRange(value, offset, offset+count);
构造新字符串对象时,会生成新的 char[] value,对内容进行复制 。这种通过创建副本对象来避免共享的手段称之为【保护性拷贝 (defensive copy)】
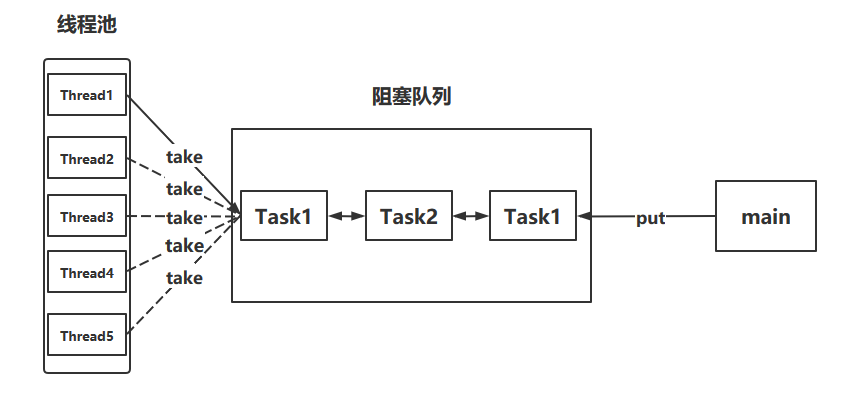
七、线程池 1、自定义线程池 图解
阻塞队列中维护了由主线程(或者其他线程)所产生的的任务
主线程类似于生产者 ,产生任务并放入阻塞队列中
线程池类似于消费者 ,得到阻塞队列中已有的任务并执行
代码 1 2 3 4 5 6 7 8 9 10 11 12 13 14 15 16 17 18 19 20 21 22 23 24 25 26 27 28 29 30 31 32 33 34 35 36 37 38 39 40 41 42 43 44 45 46 47 48 49 50 51 52 53 54 55 56 57 58 59 60 61 62 63 64 65 66 67 68 69 70 71 72 73 74 75 76 77 78 79 80 81 82 83 84 85 86 87 88 89 90 91 92 93 94 95 96 97 98 99 100 101 102 103 104 105 106 107 108 109 110 111 112 113 114 115 116 117 118 119 120 121 122 123 124 125 126 127 128 129 130 131 132 133 134 135 136 137 138 139 140 141 142 143 144 145 146 147 148 149 150 151 152 153 154 155 156 157 158 159 160 161 162 163 164 165 166 167 168 169 170 171 172 173 174 175 176 177 178 179 180 181 182 183 184 185 186 187 188 189 190 191 192 193 194 195 196 197 198 199 200 201 202 203 204 205 206 207 208 209 210 211 212 213 214 public class Demo3 {public static void main (String[] args) {ThreadPool threadPool = new ThreadPool (2 , TimeUnit.SECONDS, 1 , 4 );for (int i = 0 ; i < 10 ; i++) {try {10000 );catch (InterruptedException e) {"任务正在执行!" );class ThreadPool {private BlockingQueue<Runnable> blockingQueue;private int coreSize;private HashSet<Worker> workers = new HashSet <>();private TimeUnit timeUnit;private long timeout;private class Worker extends Thread {public Worker (Runnable task) {"初始化任务" );this .task = task;@Override public void run () {while (task != null || (task = blockingQueue.take()) != null ) {try {"执行任务" );catch (Exception e) {finally {"任务执行完毕" );null ;synchronized (workers) {"移除任务" );this );public ThreadPool (int coreSize, TimeUnit timeUnit, long timeout, int capacity) {this .coreSize = coreSize;this .timeUnit = timeUnit;new BlockingQueue <>(capacity);this .timeout = timeout;public void execute (Runnable task) {synchronized (workers) {if (workers.size() < coreSize) {Worker worker = new Worker (task);else {"线程池中线程已用完,请稍等" );class BlockingQueue <T> {private Deque<T> blockingQueue;private int capacity;private ReentrantLock lock;private Condition fullQueue;private Condition emptyQueue;public BlockingQueue (int capacity) {new ArrayDeque <>(capacity);new ReentrantLock ();this .capacity = capacity;public T take () {try {while (blockingQueue.isEmpty()) {try {catch (InterruptedException e) {T task = blockingQueue.removeFirst();return task;finally {public T takeNanos (long timeout, TimeUnit unit) {try {long nanos = unit.toNanos(timeout);while (blockingQueue.isEmpty()) {try {if (nanos < 0 ) {return null ;catch (InterruptedException e) {T task = blockingQueue.removeFirst();return task;finally {public void put (T task) {try {while (blockingQueue.size() == capacity) {try {"阻塞队列已满" );catch (InterruptedException e) {finally {public int getSize () {try {return blockingQueue.size();finally {
实现了一个简单的线程池
阻塞队列BlockingQueue用于暂存来不及被线程执行的任务
也可以说是平衡生产者和消费者执行速度上的差异
里面的获取任务和放入任务用到了生产者消费者模式
线程池中对线程Thread进行了再次的封装,封装为了Worker
在调用任务的run方法时,线程会去执行该任务,执行完毕后还会到阻塞队列中获取新任务来执行
线程池中执行任务的主要方法为execute方法
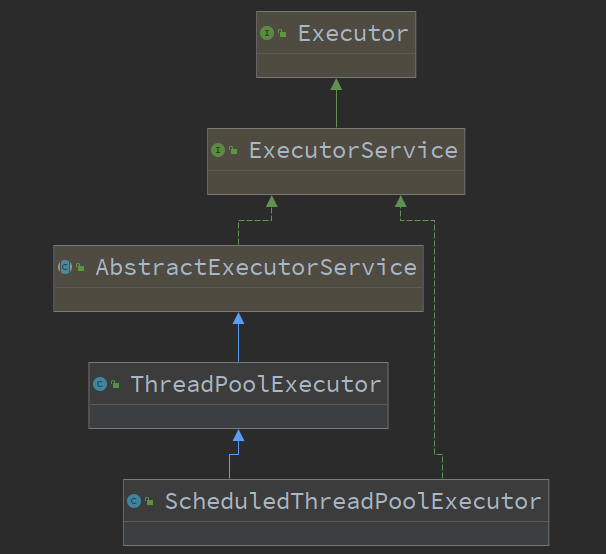
2、ThreadPoolExecutor 继承关系
线程池状态 1 2 3 4 5 6 7 8 9 10 11 12 13 14 15 16 private static final int RUNNING = -1 << COUNT_BITS;private static final int SHUTDOWN = 0 << COUNT_BITS;private static final int STOP = 1 << COUNT_BITS;private static final int TIDYING = 2 << COUNT_BITS;private static final int TERMINATED = 3 << COUNT_BITS;Copy
状态名称
高3位的值
描述
RUNNING
111
接收新任务,同时处理任务队列中的任务
SHUTDOWN
000
不接受新任务,但是处理任务队列中的任务
STOP
001
中断正在执行的任务,同时抛弃阻塞队列中的任务
TIDYING
010
任务执行完毕,活动线程为0时,即将进入终结阶段
TERMINATED
011
终结状态
线程池状态和线程池中线程的数量由一个原子整型ctl来共同表示
使用一个数来表示两个值的主要原因是:可以通过一次CAS同时更改两个属性的值
1 2 3 4 5 6 7 8 9 10 11 private final AtomicInteger ctl = new AtomicInteger (ctlOf(RUNNING, 0 ));private static final int COUNT_BITS = Integer.SIZE - 3 ;private static final int CAPACITY = (1 << COUNT_BITS) - 1 ;Copy
获取线程池状态、线程数量以及合并两个值的操作
1 2 3 4 5 6 7 8 9 10 11 private static int runStateOf (int c) { return c & ~CAPACITY; }private static int workerCountOf (int c) { return c & CAPACITY; }private static int ctlOf (int rs, int wc) { return rs | wc; }Copy
线程池属性 1 2 3 4 5 6 7 8 9 10 11 12 13 14 15 private final class Worker extends AbstractQueuedSynchronizer implements Runnable {private final BlockingQueue<Runnable> workQueue;private final ReentrantLock mainLock = new ReentrantLock ();private final HashSet<Worker> workers = new HashSet <Worker>();Copy
构造方法极其参数 ThreadPoolExecutor最全面的构造方法
也是构造自定义线程池的方法
1 2 3 4 5 6 7 public ThreadPoolExecutor (int corePoolSize, int maximumPoolSize, long keepAliveTime, TimeUnit unit, BlockingQueue<Runnable> workQueue, ThreadFactory threadFactory, RejectedExecutionHandler handler)
参数解释
corePoolSize:核心线程数
maximumPoolSize:最大线程数
maximumPoolSize - corePoolSize = 救急线程数
keepAliveTime:救急线程空闲时的最大生存时间
unit:时间单位
workQueue:阻塞队列(存放任务)
有界阻塞队列 ArrayBlockingQueue
无界阻塞队列 LinkedBlockingQueue
最多只有一个同步元素的 SynchronousQueue
优先队列 PriorityBlockingQueue
threadFactory:线程工厂(给线程取名字)
handler:拒绝策略
工作方式
当一个任务传给线程池以后,可能有以下几种可能
将任务分配给一个核心线程来执行
核心线程都在执行任务,将任务放到阻塞队列workQueue中等待被执行
阻塞队列满了,使用救急线程来执行任务
救急线程用完以后,超过生存时间(keepAliveTime)后会被释放
任务总数大于了 最大线程数(maximumPoolSize)与阻塞队列容量的最大值(workQueue.capacity),使用拒接策略
拒绝策略 如果线程到达 maximumPoolSize 仍然有新任务这时会执行拒绝策略 。拒绝策略 jdk 提供了 4 种实现
AbortPolicy:让调用者抛出 RejectedExecutionException 异常,这是默认策略
CallerRunsPolicy:让调用者运行任务
DiscardPolicy:放弃本次任务
DiscardOldestPolicy:放弃队列中最早的任务,本任务取而代之
使用 1 2 3 4 5 6 7 8 9 10 11 12 13 14 15 16 17 18 19 20 21 22 23 24 25 26 27 28 29 30 31 32 33 34 35 public class Demo1 {static AtomicInteger threadId = new AtomicInteger (0 );public static void main (String[] args) {new ArrayBlockingQueue <Runnable>(10 );ThreadFactory threadFactory = new ThreadFactory () {@Override public Thread newThread (Runnable r) {Thread thread = new Thread (r, "working_thread_" +threadId.getAndIncrement());return thread;ThreadPoolExecutor executor = new ThreadPoolExecutor (5 , 7 , 10 , TimeUnit.SECONDS, runnable, threadFactory);for (int i = 0 ; i < 20 ; i++) {new Runnable () {@Override public void run () {try {100000 );catch (InterruptedException e) {
FixedThreadPool 1 2 3 4 5 6 7 8 9 10 11 12 13 14 15 16 17 18 19 20 21 22 23 24 25 26 27 28 29 public class TestFixedThreadPool {public static void main (String[] args) {ThreadFactory factory = new ThreadFactory () {AtomicInteger atomicInteger = new AtomicInteger (1 );@Override public Thread newThread (Runnable r) {return new Thread (r, "myThread_" + atomicInteger.getAndIncrement());ExecutorService executorService = Executors.newFixedThreadPool(2 , factory);Runnable runnable = new Runnable () {@Override public void run () {"this is fixedThreadPool" );
固定大小的线程池可以传入两个参数
核心线程数:nThreads
线程工厂:threadFactory
内部调用的构造方法
1 2 3 4 ThreadPoolExecutor(nThreads, nThreads,0L , TimeUnit.MILLISECONDS,new LinkedBlockingQueue <Runnable>(),
CachedThreadPool 1 ExecutorService executorService = Executors.newCachedThreadPool();
内部构造方法
1 2 3 ThreadPoolExecutor(0 , Integer.MAX_VALUE,60L , TimeUnit.SECONDS,new SynchronousQueue <Runnable>());Copy
SingleThread 1 ExecutorService service = Executors .new SingleThreadExecutor() ;Copy
内部构造方法
1 2 3 4 new FinalizableDelegatedExecutorService new ThreadPoolExecutor (1 , 1 ,0 L, TimeUnit.MILLISECONDS,new LinkedBlockingQueue <Runnable>()));Copy
内部调用了new ThreadPoolExecutor 的构造方法,传入的corePoolSize和maximumPoolSize都为1。然后将该对象传给了FinalizableDelegatedExecutorService。该类修饰了ThreadPoolExecutor,让外部无法调用ThreadPoolExecutor内部的某些方法来修改所创建的线程池的大小。
几个注意
执行任务 execute()方法 1 execute (Runnable command) Copy
传入一个Runnable对象,执行其中的run方法
源码解析
1 2 3 4 5 6 7 8 9 10 11 12 13 14 15 16 17 18 19 20 21 22 23 24 25 26 27 28 29 30 31 32 33 34 35 36 37 38 39 40 41 public void execute(Runnable command) {if (command == null)new NullPointerException() ;int c = ctl.get() ;if (workerCountOf(c ) < corePoolSize) {if (addWorker(command , true ) )() ;if (isRunning(c ) && workQueue.offer(command)) {int recheck = ctl.get() ;if (! isRunning(recheck ) && remove(command))else if (workerCountOf(recheck ) == 0 )Worker(null , false ) ;else if (!addWorker(command , false ) )
其中调用了**addWoker()**方法,再看看看这个方法
1 2 3 4 5 6 7 8 9 10 11 12 13 14 15 16 17 18 19 20 21 22 23 24 25 26 27 28 29 30 31 32 33 34 35 36 37 38 39 40 41 42 43 44 45 46 47 48 49 50 51 52 53 54 55 56 57 58 59 60 61 62 63 64 65 66 67 68 69 70 71 72 73 74 75 76 77 78 79 80 81 82 83 84 85 86 87 88 89 private boolean addWorker (Runnable firstTask, boolean core) {for (;;) {int c = ctl.get();int rs = runStateOf(c);if (rs >= SHUTDOWN &&null &&return false ;for (;;) {int wc = workerCountOf(c);if (wc >= CAPACITY ||return false ;if (compareAndIncrementWorkerCount(c))break retry;if (runStateOf(c) != rs)continue retry;boolean workerStarted = false ;boolean workerAdded = false ;Worker w = null ;try {new Worker (firstTask);final Thread t = w.thread;if (t != null ) {final ReentrantLock mainLock = this .mainLock;try {int rs = runStateOf(ctl.get());if (rs < SHUTDOWN ||null )) {if (t.isAlive()) throw new IllegalThreadStateException ();int s = workers.size();if (s > largestPoolSize)true ;finally {if (workerAdded) {true ;finally {if (! workerStarted)return workerStarted;
submit()方法 1 Future<T > submit(Callable<T > task)Copy
传入一个Callable对象,用Future来捕获返回值
使用
1 2 3 4 5 6 7 8 9 10 11 String > future = threadPool.submit (new Callable <String >() {public String call () throws Exception {return "hello submit" ;println (future.get ());Copy
停止 shutdown() 1 2 3 4 5 6 7 8 9 10 11 12 13 14 15 16 17 18 19 20 21 22 23 24 25 26 27 28 29 30 31 32 33 34 35 36 37 38 39 40 41 42 43 44 45 46 47 48 49 50 51 52 53 54 55 56 57 58 59 60 61 62 63 64 public void shutdown () {final ReentrantLock mainLock = this .mainLock;try {finally {final void tryTerminate () {for (;;) {int c = ctl.get();if (isRunning(c) ||return ;if (workerCountOf(c) != 0 ) { return ;final ReentrantLock mainLock = this .mainLock;try {if (ctl.compareAndSet(c, ctlOf(TIDYING, 0 ))) {try {finally {0 ));return ;finally {
shutdownNow() 1 2 3 4 5 6 7 8 9 10 11 12 13 14 15 16 17 18 19 20 21 22 23 24 25 26 27 public List<Runnable> shutdownNow () {final ReentrantLock mainLock = this .mainLock;try {finally {return tasks;
Java

